Sprint planning is the heartbeat of Agile project management, setting the tempo for teams to achieve their goals. Jira stands out as an invaluable tool in this realm, streamlining and enhancing the planning process. This guide delves into the essentials of sprint planning within Jira, offering insights for both seasoned Agile practitioners and newcomers. Let’s explore how Jira can elevate your sprint planning experience.

Overview of Sprint Planning in Jira
Sprint planning, a core ceremony in Agile methodologies, is where the team collaborates to decide on the scope of work for the upcoming sprint. It’s a blend of strategy, foresight, and teamwork. In Jira, this process is facilitated with user-friendly interfaces, powerful tools, and intuitive features.
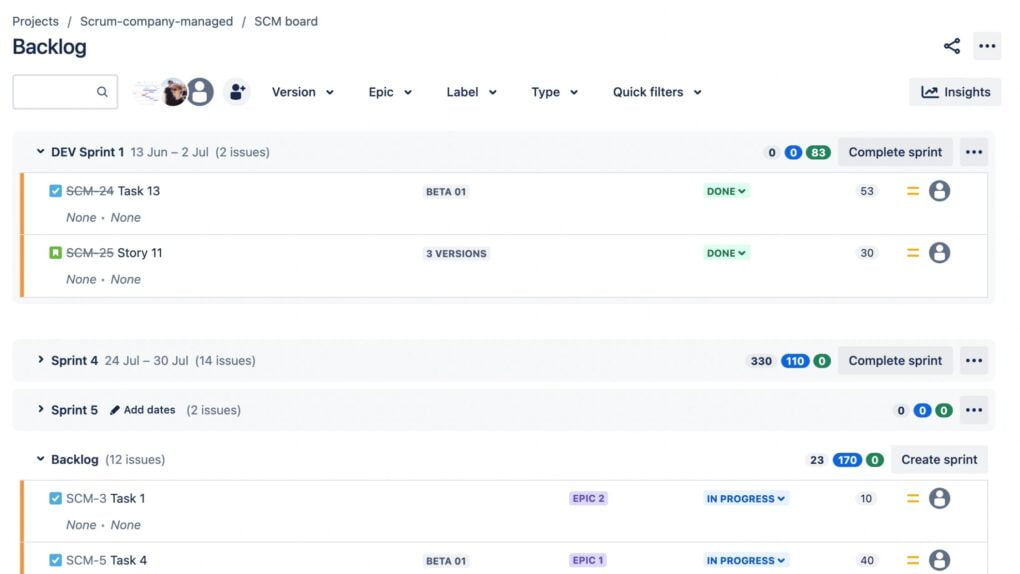
In Jira, sprint planning revolves around the ‘Active Sprints‘ or ‘Backlog‘ view, where the team’s backlog items reside. It is here that product owners, along with the team, can prioritize, estimate, and assign user stories, tasks, or bugs to specific sprints. The drag-and-drop functionality allows easy movement of issues into the sprint, ensuring the team commits to just the right amount of work.
Jira’s integrated features, such as filters, custom workflows, and estimation fields, further empower teams to have structured and productive planning sessions. Real-time collaboration is another highlight, ensuring everyone is on the same page, even if they’re continents apart.
In essence, Jira not only supports the fundamentals of sprint planning but also enhances them, allowing teams to focus more on strategic decision-making and less on administrative hurdles.
What to Prepare Before Sprint Planning
Before diving into sprint planning, preparation is key. A well-prepared backlog and clear understanding of the team’s capacity can significantly streamline the planning process and lead to more successful sprints. Here’s what you should focus on before the planning session begins:
1. Product Backlog Readiness:
- Prioritize the Backlog: Ensure that the most important and urgent items are at the top. This involves collaborating with stakeholders to align items with business objectives.
- Refine User Stories and Tasks: Each item should be clear, understandable, and actionable. Ambiguities should be clarified, and larger user stories may need to be broken down into manageable chunks.
- Estimations: Using techniques like story points or time estimates, ensure that each item in the backlog has an associated effort estimation. This aids in setting realistic sprint goals.
2. Team Availability:
- Factor in Absences: Consider upcoming holidays, vacations, or any planned leave by team members. This will impact the team’s capacity for the sprint.
- Determine Team Capacity: Calculate the total available hours or story points the team can commit to, based on past performance and the current team size.
3. Previous Sprint’s Retrospective Points:
- Action Items: Address points of improvement identified in the last retrospective. Whether it’s a process tweak or a new tool, ensure the necessary changes are in place before the next sprint begins.
- Feedback Loop: Revisit the successes and challenges of the previous sprint. It provides a foundation upon which the upcoming sprint can be planned and helps avoid past pitfalls.
Sprint Setup in Jira
Here’s a step-by-step guide to get you started:
1. Navigating to the Sprint Planning Section:
- Access the Right Board: Begin by navigating to your Scrum board, which is tailored for Agile methodologies with sprints in mind.
- Go to ‘Backlog’: This view presents you with all the items in your product backlog, making it easier to select and move them into your upcoming sprint.
2. Initiating a New Sprint:
- Create a New Sprint: At the top of the backlog, there’s an option labeled “Create Sprint.” Clicking this initializes a new sprint container.
- Add Items to the Sprint: Using the drag-and-drop functionality, move items from the product backlog into the newly created sprint. Alternatively, you can select multiple items and use the ‘bulk change’ option to add them to the sprint.
3. Configure Sprint Settings:
- Sprint Name: Give your sprint a meaningful name, typically reflecting its main objectives or a time reference (e.g., “Sprint 12: User Dashboard Enhancements” or “April 1st – April 15th Sprint”).
- Sprint Dates: Define the start and end dates for the sprint, ensuring it aligns with the decided sprint duration (e.g., two weeks).
- Sprint Goal (Optional but Recommended): Add a concise goal that summarizes the main objective of this sprint. It serves as a focal point for the team throughout the sprint duration.

4. Start the Sprint:
- Once everything is in place and the team is in agreement, click the “Start Sprint” button. This sets the sprint in motion, and the team can then begin working on the selected items.
Sprint Report in Jira
In Jira, the Sprint Report plays this crucial role, providing a visual and data-driven recap of the sprint’s outcomes. Here’s what you need to know about this invaluable feature:
1. The Essence of a Sprint Report:
- Snapshot of Performance: At its core, the Sprint Report in Jira offers a concise overview of what was accomplished during the sprint and what remained in the backlog.
- Informed Decisions: By analyzing the report, teams and stakeholders can make data-driven decisions, fine-tuning their approach for subsequent sprints.
2. Accessing the Sprint Report in Jira:
- Select ‘Reports’: Located usually in the top navigation bar, this will lead you to Jira’s report section.
- Choose ‘Sprint Report’: From the list of available reports, pick the Sprint Report. You can then select the specific sprint you want to analyze from a dropdown list.
3. Key Components of the Sprint Report:
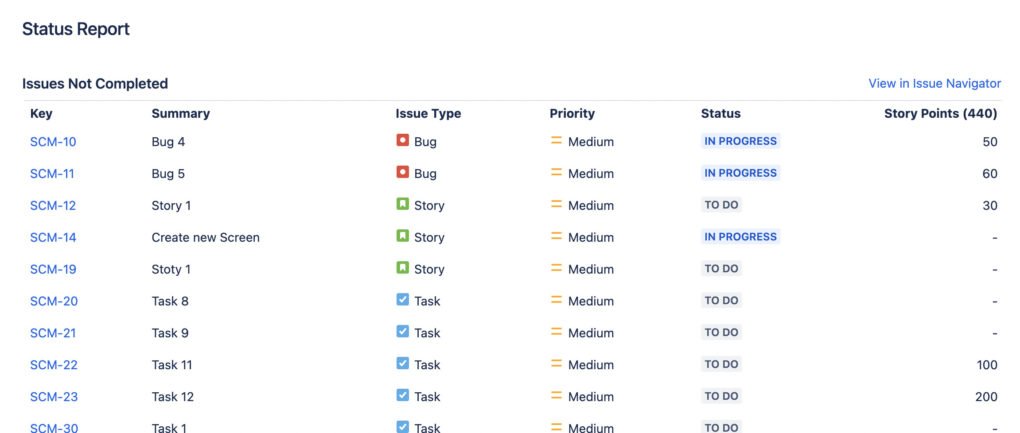
- Completed Issues: This section lists all the issues that were successfully resolved during the sprint. It provides clarity on what the team achieved.
- Incomplete Issues: These are the items that the team couldn’t complete during the sprint. Understanding the reasons behind these carry-overs can be instrumental for future planning.
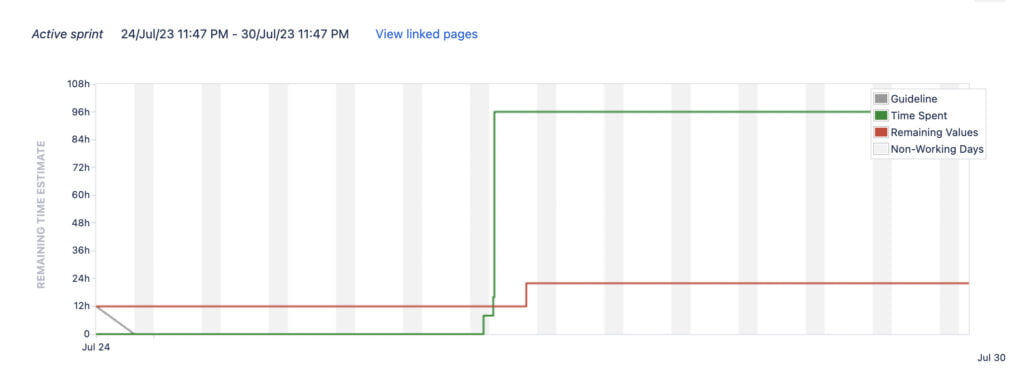
- Burndown Chart: An essential visual tool, the burndown chart showcases the amount of work completed over time compared to the initial estimates. It’s a powerful indicator of the team’s pace and whether they are on track to meet sprint objectives.
4. Leveraging the Sprint Report for Improvement:
- Analyze Incomplete Issues: Understanding why certain tasks weren’t completed can provide insights into estimation inaccuracies, unforeseen challenges, or resource constraints.
- Evaluate the Burndown: A flat line in the burndown chart might indicate periods of stagnation. Conversely, a steep drop could show a rush towards the end, hinting at potential quality compromises.
- Gather Feedback: Share the report with the team during retrospectives. It serves as a tangible reference point for discussions, allowing the team to celebrate successes and strategize for challenges.
Tips for sprint planning in Jira
Effective sprint planning requires using Jira’s powerful features to streamline workflows and ensure that your team is aligned on priorities.
While Jira streamlines sprint planning, managers and team members can further enhance their skills through agile corporate training, gaining hands-on techniques for backlog grooming, estimation, and team collaboration.
Below are some tips to optimize your sprint planning process and enhance your team’s efficiency in Jira.
1. Leverage JQL (Jira Query Language):
- Use JQL to create specific queries that target exactly what you need for planning.
- Example: Suppose you want to find all high-priority bugs that haven’t been assigned to any sprint: priority = Highest AND issuetype = Bug AND Sprint IS EMPTY.
2. Use Quick Filters:
- Set up quick filters on your board for faster issue viewing during planning.
- Example: A filter like “UX Tasks” can instantly show all user experience related issues, helping the team to group or tackle them together.
3. Bulk Change for Efficiency:
- Group select similar tasks and edit them together to save time.
- Example: If you want to move multiple tasks from the backlog into the next sprint, select them together and use the ‘bulk change’ to assign them to the desired sprint.
4. Estimation Techniques:
- Establish a consistent unit of measure for story points or time-based estimates.
- Example: If using Fibonacci sequence for story points, an easy task might be 1 point, a moderate task 3 points, and a complex task 8 points.
5. Utilize Custom Workflows:
- Design workflows that precisely reflect your team’s process stages.
- Example: Instead of the default “To Do → In Progress → Done”, you might have “Backlog → Design → Development → QA → Done”.
6. Backlog Grooming:
- Dedicate time between sprints to refine and re-prioritize your backlog.
- Example: Move outdated issues to a ‘Future Consideration’ epic or close tasks that are no longer relevant.
7. Link Related Issues:
- Tip: Showcase dependencies or related work using Jira’s linking feature.
- Example: If a task is blocked by a bug, link the task to the bug with the “is blocked by” link type.
8. Use Labels and Components Wisely:
- Consistently label issues for easy categorization.
- Example: Label all performance-related tasks as “Performance” to quickly filter and assess them during planning.
9. Review Past Sprints:
- Begin planning by assessing the previous sprint’s outcomes.
- Example: Look at the ‘Velocity Chart’ from the last sprint to gauge how much work the team is likely to handle in the upcoming sprint.
10. Utilize Sprint Permissions:
- Configure permissions to prevent unwanted sprint changes.
- Example: Restrict sprint closure to only Scrum Masters to ensure the sprint isn’t closed prematurely.
Conclusion
Sprint planning is pivotal in Agile development, and Jira acts as a guiding beacon in this endeavor. Through Jira’s diverse features, teams can harness a structured, efficient approach to planning. However, the tool’s essence is best realized when combined with effective team collaboration and clear communication. As you navigate the Agile landscape with Jira, let this guide be your touchstone, driving you towards each sprint’s success. Here’s to impactful planning and outstanding outcomes!