How to Create custom filters for your Jira board

How to Create custom filters for your Jira board

If you’re using Jira for project management, you know how important it is to keep track of all your tasks and projects. Jira is powerful, but sometimes you need to see only the issues that matter to you right now. That’s where custom filters come in handy. Let’s explore how you can make your own filters to streamline your workflow.

What are Jira Filters?

Jira filters are a powerful feature in Jira, a popular project management tool widely used in software development and other fields. These filters help users manage large volumes of issues by allowing them to view only those that meet certain criteria. Consequently, this makes it easier to focus on specific tasks, projects, or teams without getting overwhelmed by the full list of issues.

Getting Started with Custom Filters

Initially, you need to know where to find the tools to create these filters. You’ll primarily work with something called JQL, or Jira Query Language, which essentially acts like a special command line for instructing Jira exactly what you want to see.

How to Create custom filters for your Jira board

To create custom filters for your Jira board, the process varies slightly depending on whether you are using a team-managed or company-managed project. Consequently, below you’ll find step-by-step instructions for both types of projects.

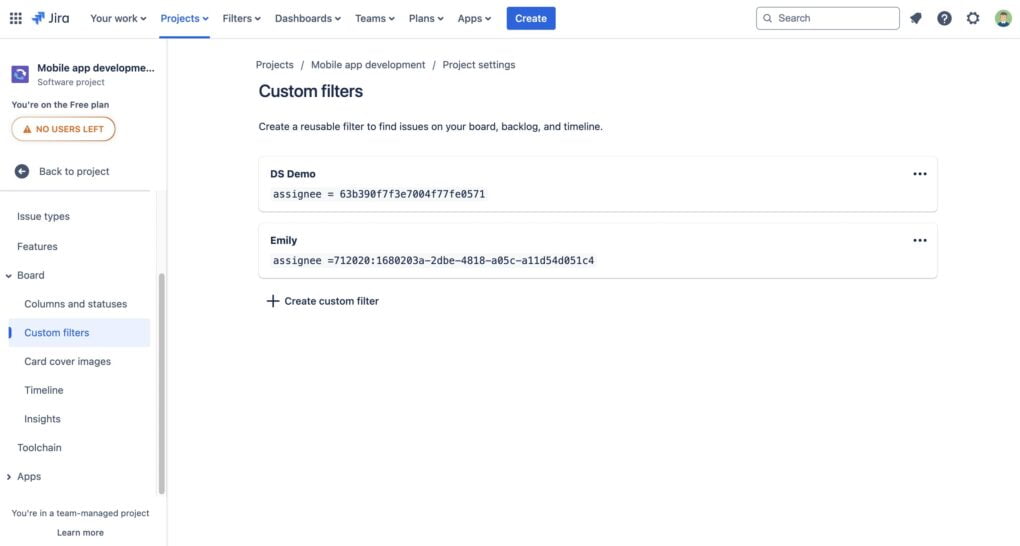
For Team-Managed Projects

  1. Navigate to Project Settings:
    • Go to your project and click on ‘Project settings‘ found in the sidebar.
  2. Access Board Settings:Create a New Filter
    • In the project settings menu, select ‘Board’ followed by ‘Custom filters’.
  3. Create a New Filter:
    • Click to add a new filter. Subsequently, you will need to provide a name and a description for your custom filter, which will help identify its purpose.
    • Write your filter query using Jira Query Language (JQL). As you type, Jira will validate your query and subsequently show autocomplete suggestions to help you complete your query accurately.
    • Click ‘Create’ to save your filter.
  4. Use Your Filter:
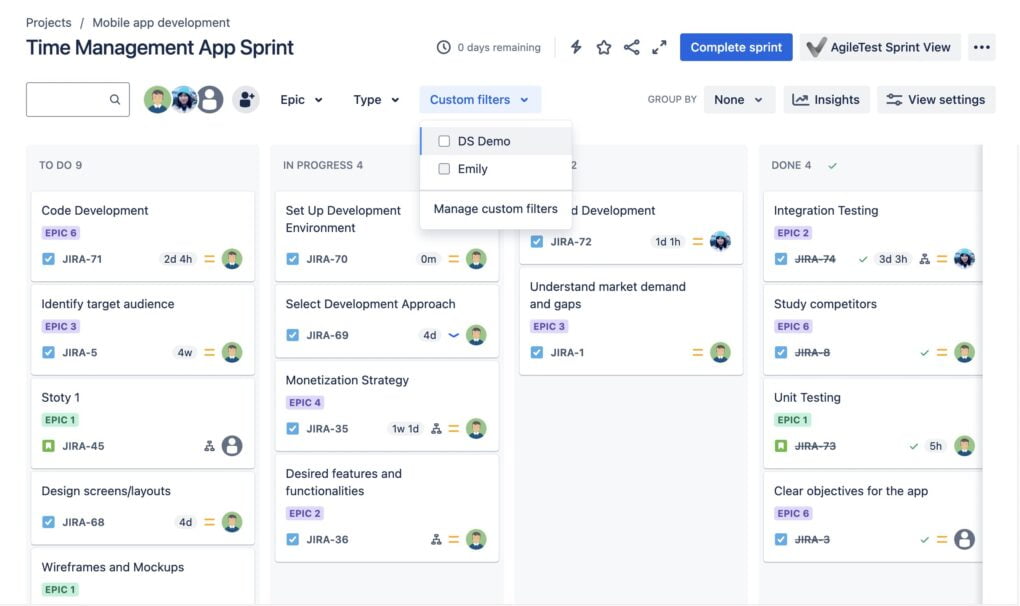
    • Back in your board view, you will now see a new dropdown menu. This menu allows you to select and apply your custom filters. You can use multiple filters at the same time to narrow down the issues displayed on the board.Use Your Filter
  5. Manage Your Filters:
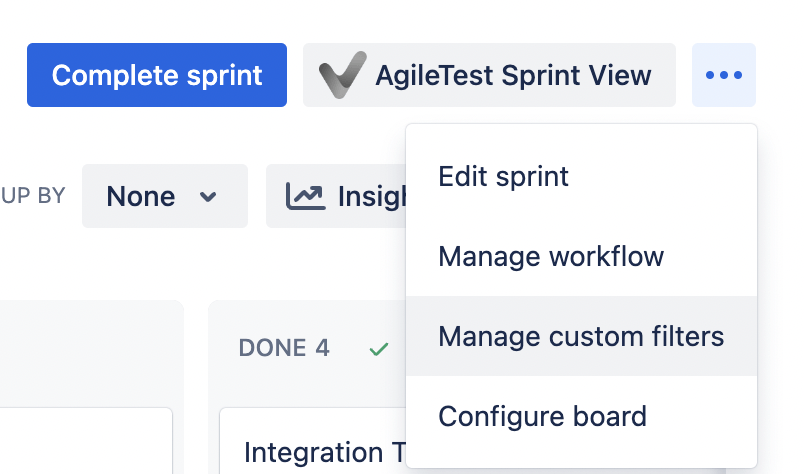
    • To edit or delete your custom filters, click the (•••) menu on your board or backlog and select ‘Manage custom filters’.Manage Your Filters

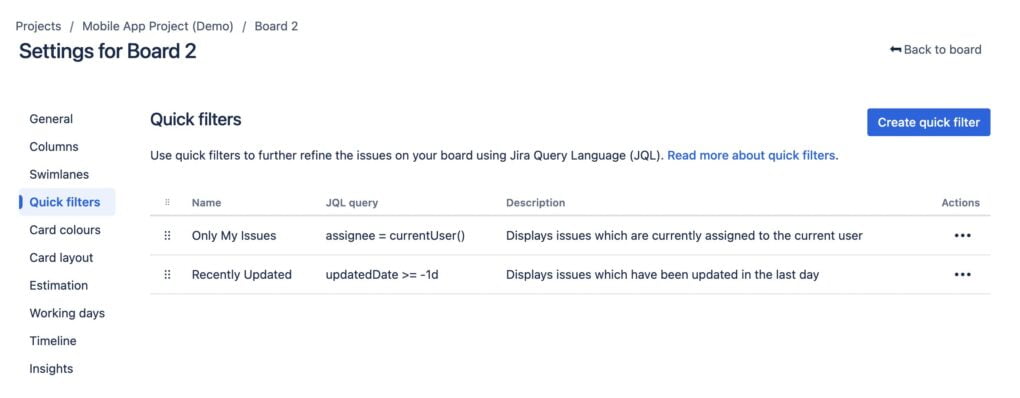
For Company-Managed Projects:

  1. Access Board Settings:
    • Navigate to your board, click the (•••) icon in the top right corner, and select ‘Configure Board’.
  2. Configure Quick Filters:
    • In the board settings menu, click on the ‘Quick Filters’ tab.
  3. Create a Filter:
    • Enter your JQL query in the provided field to define the filter. This query will determine which issues are shown when the filter is applied.
  4. Apply and View Filters:
    • Once created, your new filter(s) will now appear above your board. You can then click on any filter to apply it and effectively narrow down the issues visible on your board.Configure Quick Filters

How to Create cross-project board via custom filters

Creating a cross-project board in Jira using custom filters is an effective way to manage issues across multiple projects from a single view. This can be particularly useful in environments where teams are working on interrelated projects and need to maintain oversight across these projects. Here’s how you can set this up in a company-managed project:

Create a Custom Filter Using JQL – Step 1

  1. Navigate to Advanced Issue Search:
    • Go to the top navigation bar and select ‘Filters’.
    • Choose ‘Advanced issue search’.
  2. Write Your Custom Filter Query:
    • Use Jira Query Language (JQL) to specify the criteria for issues across the projects you want to track. For example, to track all open issues in two projects named “ProjectA” and “ProjectB”, your JQL might look like this:
      project in (ProjectA, ProjectB) AND status != Done
  3. Save Your Filter:
    • Once you are satisfied with the query and its results, save the filter by giving it a meaningful name. This makes it easier to identify and use when creating your board.

Create a Board in a Company-Managed Project – Step 2

  1. Navigate to Board Creation:
    • Go to the main dashboard of your Jira instance and select ‘Boards’ from the top menu.
    • Click on ‘View All Boards’ and then select ‘+ Create Board’.
  2. Choose the Board Type:
    • Select whether you want to create a Scrum board (for sprints) or a Kanban board (for continuous flow). Choose the one that best suits your workflow.

Apply Filter to the Board – Step 3

  1. Select Board from an Existing Saved Filter:
    • When prompted to choose the source for your board’s issues, select ‘Board from an existing Saved Filter’.
    • Look up and select the filter you created earlier.
  2. Name Your New Board:
    • Give your new board a name that reflects its purpose and the projects it encompasses.
  3. Create the Board:
    • Click ‘Create Board’. This will create your new cross-project board.

Configure Your Board – Step 4

  1. Customize Columns:
    • Once your board is created, you can customize it by mapping or unmapping statuses to different columns. This does not affect other boards and allows you to tailor the workflow specifically for this board.
    • Navigate to ‘Board Settings’ and adjust the columns as necessary to reflect the statuses of your issues.

Use Cases for Custom Filters

Custom filters in Jira are incredibly useful tools for enhancing project management, as they help teams focus on specific aspects of their workload. Consequently, here are several practical use cases for custom filters that demonstrate their versatility and substantial impact on workflow efficiency and effectiveness:

1. Tracking Specific Teams or Projects

Custom filters can be set to display only issues related to certain teams or projects. This is particularly beneficial in large organizations where different teams may be engaged in distinct components of a larger project. For example, a filter could be specifically configured to show only issues assigned to the “Development Team” or those stemming from the “Marketing Campaign” project.

2. Prioritizing Urgent Issues

Moreover, filters can help teams prioritize by highlighting tasks that require immediate attention. One could create a filter to display issues with high priority or those that are overdue. For instance, employing JQL such as priority = Highest AND due <= now() would list all high-priority issues that are past their due date.

3. Managing Issue Types

Additionally, different types of work items, such as bugs, tasks, and enhancements, can be managed more effectively by using filters to segregate them. This approach allows teams to concentrate on specific types of issues during different phases of a project, thereby improving clarity and productivity.

4. Monitoring Progress and Statuses

Furthermore, filters can be utilized to monitor the progress of issues by showing only those in certain statuses, such as “In Progress” or “In Review”. This aids project managers and team leads in quickly getting a sense of where things stand and identifying any bottlenecks.

5. Handling Customer Support

In organizations that use Jira to manage customer support, filters can significantly assist support teams in tracking tickets based on severity, customer tier, or response time requirements. As a result, this strategy effectively helps in prioritizing customer issues based on their urgency and impact.

6. Compliance and Auditing

“For projects that require adherence to regulatory standards or internal audits, filters can be established to meticulously track compliance-related tasks or any deviations that need to be addressed. Consequently, this facilitates the management and review of audit trails, making the process more efficient.

7. Resource Allocation

Similarly, managers can use filters to view tasks assigned to specific individuals or teams to manage workload and resource allocation effectively. This can help in identifying overburdened team members and adjusting assignments accordingly.

8. Custom Views for Stakeholders

Different stakeholders might be interested in various aspects of a project. Accordingly, custom filters can create tailored views for stakeholders such as clients, upper management, or external partners, focusing exclusively on the information that is most relevant to them.

9. Enhancing Agile Practices

In agile environments, filters are crucial for managing backlogs, sprints, and releases. For instance, a filter might show only the issues planned for the next sprint, aiding scrum masters and product owners in sprint planning and review meetings.

10. Remote Work Tracking

Lastly, for teams working remotely, filters allow managers to actively track tasks suited for or influenced by remote setups, including tasks requiring collaboration tools or those that team members have taken on independently.

By employing custom filters, teams can effectively streamline their Jira usage to better suit their specific needs, thus reducing clutter and focusing attention where it’s most needed. Consequently, this strategic approach ultimately leads to increased productivity and better project outcomes.

Previous Post
Get started with Change Management in Jira Service Management
Next Post
Top 3 Poll Tools on Confluence
Menu