Change management is essential in IT operations, ensuring that system changes minimize disruptions and maintain service quality. In this context, Jira Service Management by Atlassian emerges as a powerful tool. It offers a robust platform for managing changes efficiently, with integrated workflows and issue tracking capabilities.
This blog will guide you through the basics of implementing effective change management using Jira Service Management. Stay tuned as we delve into setting up, managing, and optimizing change management in Jira Service Management.
Lasted blog: Get started with problem management in Jira Service Management
What is Change Management?
Change management is a systematic approach used to deal with the transition or transformation of an organization’s goals, processes, or technologies. The objective is to implement new methods and systems in a way that minimizes disruption and maximizes benefits to the organization.
Key Elements of Change Management:
- Assessment: Identifying the need for change and the potential impacts on the organization.
- Planning: Developing a strategy to address these needs, which includes setting objectives, defining stakeholders’ roles, and allocating resources.
- Implementation: Executing the change in a controlled manner, often using project management tools to ensure alignment with broader business goals.
- Monitoring: Reviewing the impact of the change and making necessary adjustments to ensure desired outcomes.
- Communication: Keeping everyone in the organization informed about the change, why it’s happening, and how it will benefit them.
What is Change Management in Jira Service Management (JSM)?
Change management, often referred to as change enablement, is a crucial service management practice in IT. It aims to minimize risks and disruptions while implementing changes to critical systems and services. In Jira Service Management, this practice is equipped with tools and features specifically designed to manage the lifecycle of changes effectively, from initiation through approval to implementation.
Core Concepts of Change Management in Jira Service Management:
Change Requests: In Jira Service Management, change requests are used to track and manage any addition, modification, or removal of elements that could impact IT services. This ensures that every change is recorded, evaluated, and implemented in a controlled manner.
Common Types of Changes:
Standard Changes:
- Definition: Low-risk, frequently occurring changes that are pre-approved and follow a documented process.
- Example: Adding memory or storage to a server.
- Jira Management: These can be automated or quickly approved based on predefined criteria within Jira workflows.
Normal Changes:
- Definition: Changes that are not urgent but require thorough review and approval by the Change Advisory Board (CAB).
- Example: Upgrading to a new content management system.
- Jira Management: These changes typically go through several stages of approvals and reviews within Jira, ensuring that all impacts are considered before implementation.
Emergency Changes:
- Definition: Urgent changes prompted by unexpected issues or threats that need immediate resolution.
- Example: Implementing a critical security patch or resolving a major system outage.
- Jira Management: Emergency changes can bypass normal procedures to expedite resolution, but they are tracked meticulously for audit purposes and post-implementation review.
Enhanced Capabilities with Jira Service Management:
- Integrated Planning and Execution: Jira’s tools allow for seamless integration of change planning and execution, enabling real-time updates and communications across teams.
- Visibility and Control: Every change request is visible and trackable, providing all team members with updated information on the status and impact of changes.
- Risk and Impact Analysis: Tools within Jira help teams assess potential risks and impacts of proposed changes, ensuring informed decision-making processes.
- Automation of Repetitive Tasks: Routine tasks like notifications, status updates, and scheduling are automated, improving efficiency and reducing the likelihood of human error.
The change management process
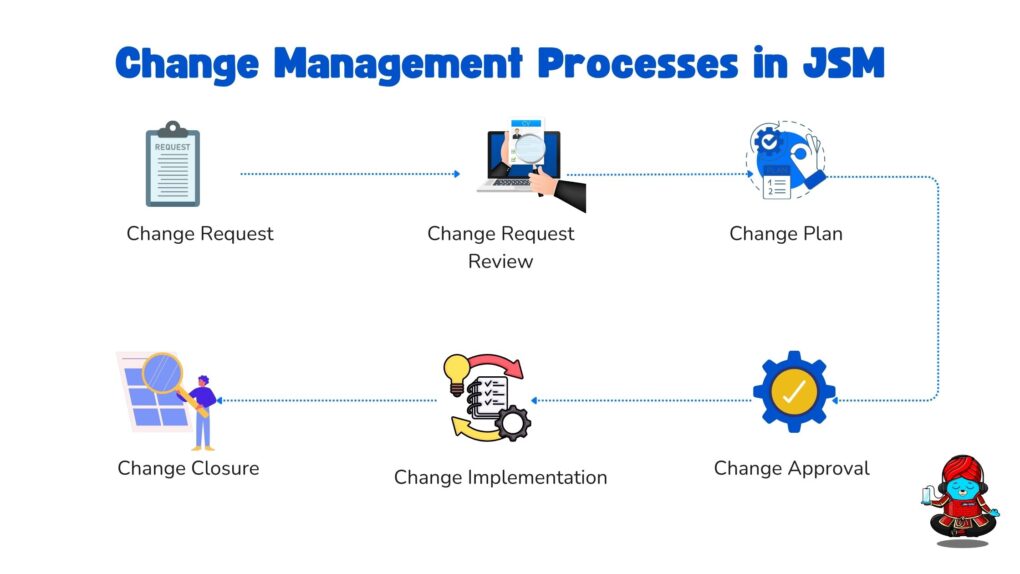
The change management process has shifted from traditional, lengthy review cycles and approvals by non-technical stakeholders to a more streamlined, automated, and collaborative approach. This new method increases agility and maintains a balance between innovation speed and risk management, particularly for nimble, high-velocity teams. Here’s a basic overview of how this process can be structured in Jira Service Management:
1. Change Request:
Initiation: Someone identifies the need for a change and submits a request in Jira Service Management. This request includes detailed notes on the potential risks, the expected implementation process, and the systems that will be affected.
2. Change Request Review:
Evaluation: A change manager or a designated peer reviewer evaluates the initial request. They assess how likely the change is to succeed, the accuracy of the identified risks and rewards, and determine whether the change is justified and beneficial.
3. Change Plan:
Strategy Development: The team collaborates to draft a comprehensive plan for implementing the change. This plan outlines the expected outcomes, the resources required, a timeline, testing requirements, and contingency measures (i.e., rollback strategies) for reversing the change if necessary.
4. Change Approval:
Confirmation: The proposed change plan is reviewed and approved by the appropriate personnel, which might include a change manager, peer reviewer, or a Change Advisory Board (CAB), depending on the change’s scope and impact.
5. Change Implementation:
Execution: The team implements the change, closely following the documented procedures. Throughout this phase, all actions and results are meticulously documented to ensure everything aligns with the plan.
6. Change Closure:
Finalization: Once the change is fully implemented, the change manager conducts a final review. They close the change request in the system and prepare a report detailing whether the change was successful, implemented on time, stayed within budget, and met the expected outcomes.
Benefits of This Process in Jira Service Management:
- Increased Efficiency: Automation of routine tasks, such as notifications and updates, speeds up the change management process and reduces manual workload.
- Enhanced Collaboration: The platform fosters collaboration between IT and development teams by providing tools that facilitate communication and information sharing.
- Improved Oversight: Integrated reporting tools and dashboards offer real-time visibility into the status of change processes, helping teams to manage risks effectively and make informed decisions.
How to get started with change management in Jira Service Management
Implementing change management in Jira Service Management (JSM) can streamline how your organization handles changes, ensuring processes are both efficient and compliant. Here’s a step-by-step guide to get you started:
1. Utilize the Native Change Management Workflow:
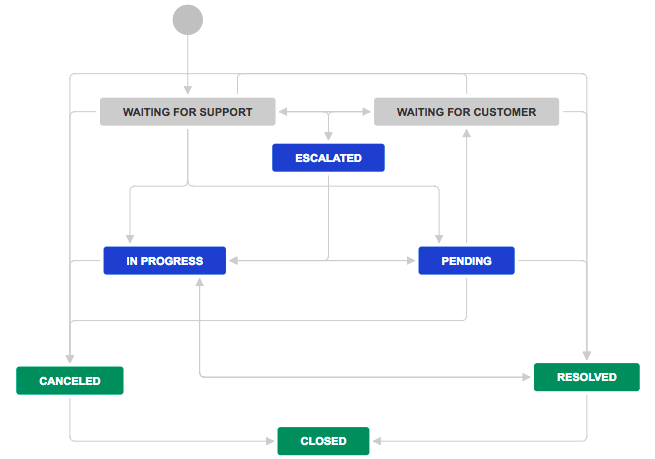
Default Workflow: Your IT service project template in JSM comes equipped with a change management workflow designed to record, assess, approve, and implement change requests efficiently.
Customization: Start with the default workflow and customize it to fit your business needs. This might involve editing stages, transitions, or adding new rules. Learn more about editing workflows.
2. Configure Fields for Change Requests:
Default Fields: By default, the Change issue type includes several fields in the agent’s view. These are tailored to capture all necessary details for effective change management.
Custom Fields: If the default fields do not fully meet your needs, you can add custom fields to better align with your specific requirements. Add a new custom field to a service project
3. Set Up Enforced Approvals:
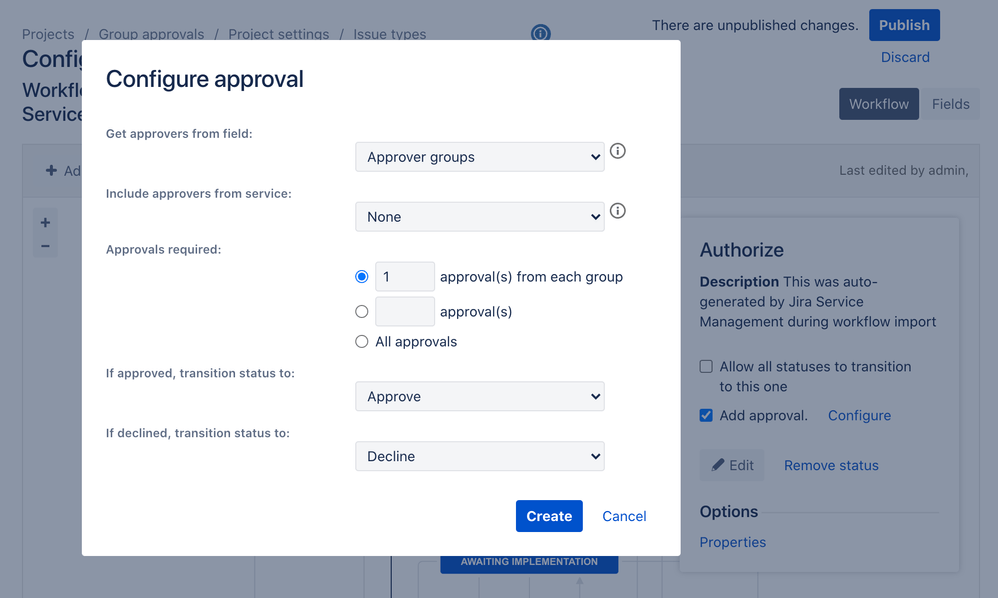
Approval Permissions: By default, any agent or admin can transition an issue through a review stage. To enhance control, you can enforce approvals, requiring specific team members or groups to review and approve the change before it progresses.
Approval Steps: Add approval steps to your workflow at the relevant statuses. This can be managed using default fields for individual or group approvals, or by creating custom fields for entering approvers. Read more about setting up approvals.
4. Automate Standard Changes:
Automation Rule: The IT service project template includes an automation rule that pre-approves standard change requests. This is ideal for changes that are low-risk and occur frequently.
Customization of Automation: You can disable or adjust this rule to better suit your needs by navigating to Project settings > Automation and editing the rule named “Auto-approve standard change requests.”
Repetitive Task Automation: Learn how to set up additional rules to automate repetitive tasks, which can significantly reduce manual workloads and streamline processes.
5. Utilize the Change Calendar:
Accessing the Calendar: From the navigation panel on the left, select Change calendar. This tool allows you to schedule and view all changes, enhancing visibility and planning.
Calendar Features:
- View scheduled change requests by day, week, or month.
- Create new change requests directly from the calendar at a selected time.
- View or edit details of existing change requests.
- Filter change requests by service project, status, and affected service to better manage and coordinate changes.
By following these steps, you can effectively implement and manage change management in Jira Service Management. Starting with the default tools and gradually customizing them allows your team to adapt to the system while maintaining control over changes, minimizing risks, and enhancing operational efficiencies.
Best Practices for Change Management in Jira Service Management
Embrace Standard Changes as the New Normal:
Identify Standard Changes: Review common change requests to determine which can be classified as standard changes. Standard changes are low-risk and occur frequently, which allows teams to pre-approve and automate them.
Reduce Backlog: By moving more changes to the standard change path, you can speed up the majority of your change requests and free up resources to focus on more complex, normal changes.
Streamline Change Request Intake:
Self-Service Portal: Utilize the self-service portal in Jira Service Management for IT, developer, and business teams to submit change requests easily. This portal can offer options for different types of requests, such as pre-approved maintenance or more critical system upgrades that require additional review.
Adopt an Automated Risk Model:
Risk Assessment Configuration: Configure the request form in Jira Service Management to collect essential data for assessing the risk of each change. Automations can then calculate and assign risk levels based on this data.
Automated Routing and Notifications: Use automation to classify change requests, route them through the appropriate workflow paths, and notify stakeholders of high-risk changes needing further review.
Integrate CI/CD Tools for Automatic Change Requests:
Seamless Integration: Connect Jira Service Management with CI/CD tools like Bitbucket Pipelines, Jenkins, and CircleCI. This integration automatically registers changes as requests within Jira Service Management, providing a complete audit trail.
Change Management in Workflows: Developers can monitor the progress of change requests directly from their CI/CD tools, ensuring they pull all necessary information into Jira for efficient management and approval.
Connect a CI/CD pipeline to Jira Service Management Cloud
Break Down Complex Changes:
Manageable Units: Decompose complex changes into smaller, manageable tasks. This approach makes it easier to handle, track, and reduce the associated risks with each part of the change.
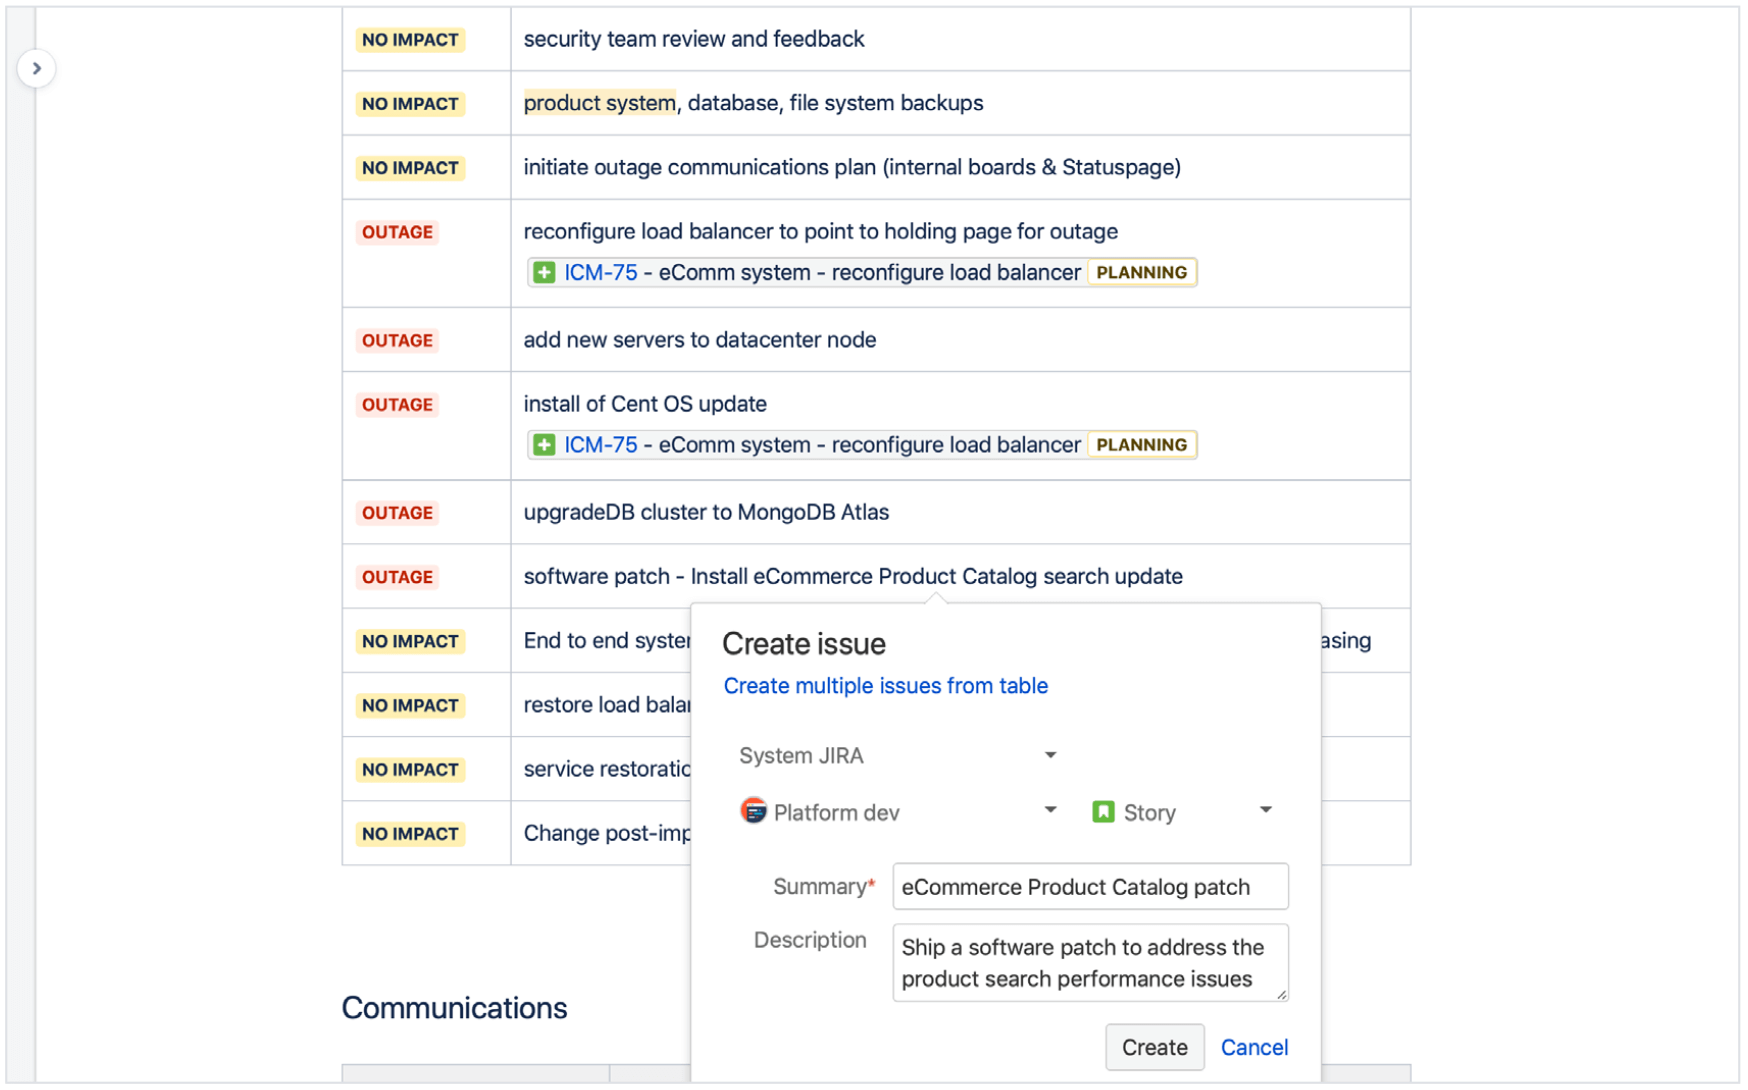
Collaborate in Confluence: Use Confluence to document changes, gather feedback, and iterate on tasks in real-time. Create Jira issues, stories, tasks, and changes directly from Confluence, linking them to the main change request for better tracking.
Measure and Improve with Change Metrics and KPIs:
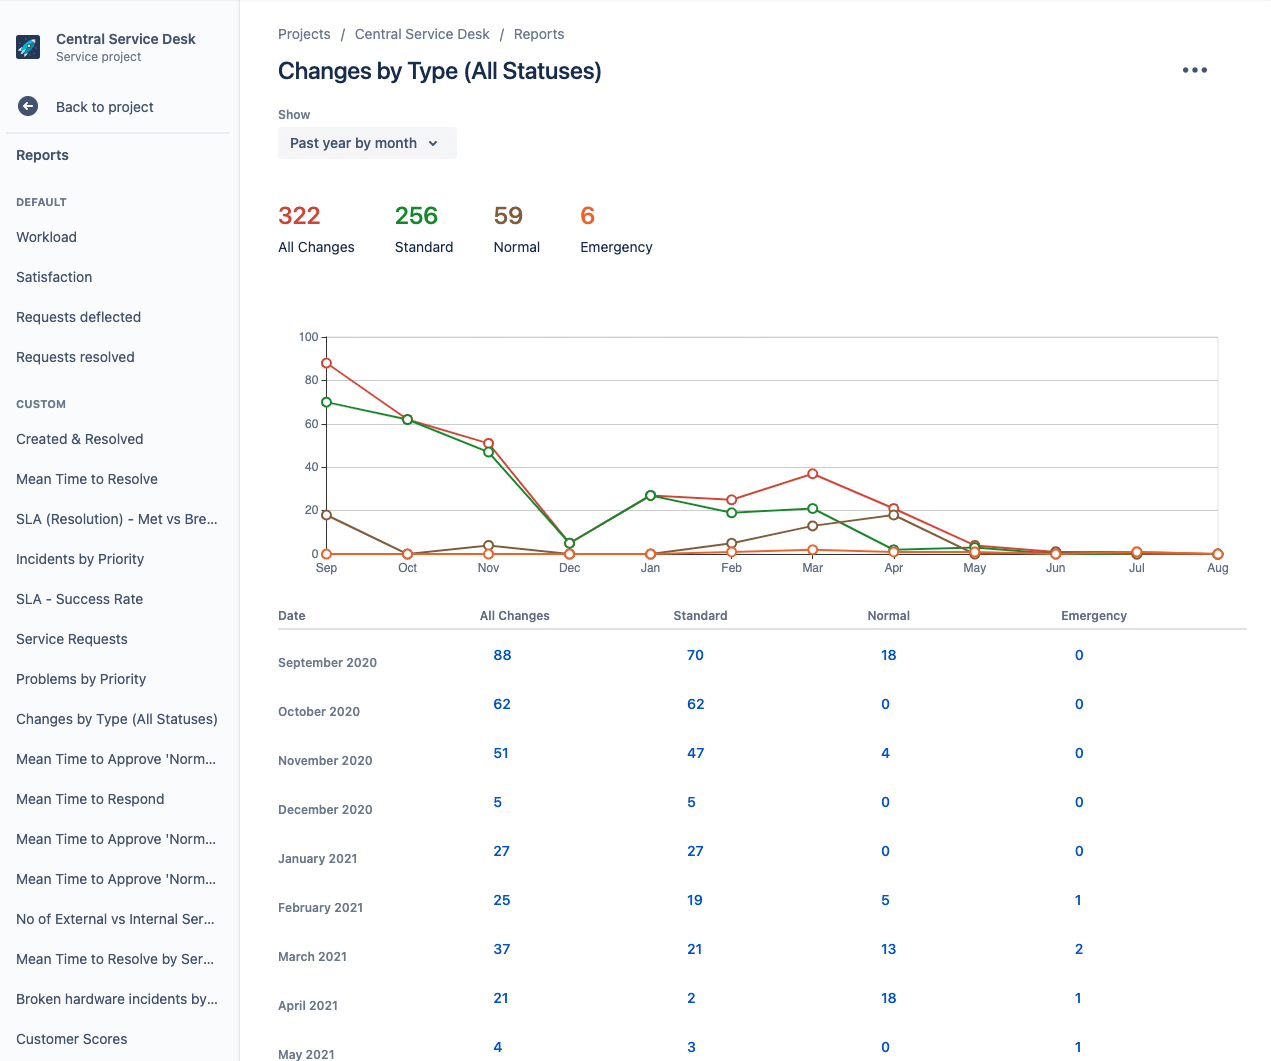
Reporting and Analytics: Use out-of-the-box reports and custom dashboards in Jira Service Management to analyze change management performance. Focus on metrics that highlight the timeliness, impact, and compliance of changes.
Continuous Improvement: Regularly review these metrics to identify areas for improvement and ensure that changes are achieving desired outcomes without negatively impacting services.
Conclusion
Effective change management is crucial for maintaining stability and agility in IT operations. Jira Service Management provides an ideal platform to streamline and enhance these processes with its robust tools and features. Starting with its intuitive workflows and extending through its integration capabilities, Jira empowers teams to implement changes efficiently and with minimal disruption.
As you refine your change management practices, leverage the best practices discussed in this blog to minimize risks and align your processes with broader organizational goals. Embrace Jira Service Management to transform your change management into a strategic asset that supports your business’s growth and adaptability.


