Managing tasks and projects in Jira can get complex without a clear understanding of issue types and their hierarchy. Jira’s issue types help teams categorize work, track progress, and stay organized.
In this blog, we’ll dive into Jira’s issue type hierarchy, explore each level, and show you how to customize it to fit your team’s needs. By the end, you’ll have a solid grasp of using Jira’s issue types to streamline your workflow and keep your projects on track.
1. What is an Issue in Jira?
In Jira, an issue is any task, bug, request, or work item that needs to be tracked. It’s basically anything your team needs to work on. Issues help you keep track of what needs to be done, who’s working on it, and when it’s due.
Each issue comes with key details like a summary, description, who’s responsible, priority, status, and due date. This makes it easy for everyone on the team to know what the issue is about and how it fits into the overall project.
Understanding issues is important because they are at the core of everything you do in Jira. They’re the main way you’ll manage and track your work, so getting familiar with how they work will help you use Jira more effectively.
2. Understanding Jira Issue Types
Jira comes with different issue types to help you organize and categorize your work. Each issue type serves a specific purpose, making it easier to track various kinds of work in your projects. Common issue types include Tasks, Bugs, Stories, Epics, and Sub-tasks.
- Tasks are standard work items that need to be completed.
- Bugs represent problems or errors that need fixing. (To keep track of Jira bugs, try AgileTest)
- Stories describe user requirements or features.
- Epics are large chunks of work that can be broken down into smaller tasks or stories.
- Sub-tasks are smaller pieces of work that help break down tasks, bugs, or stories into manageable steps.
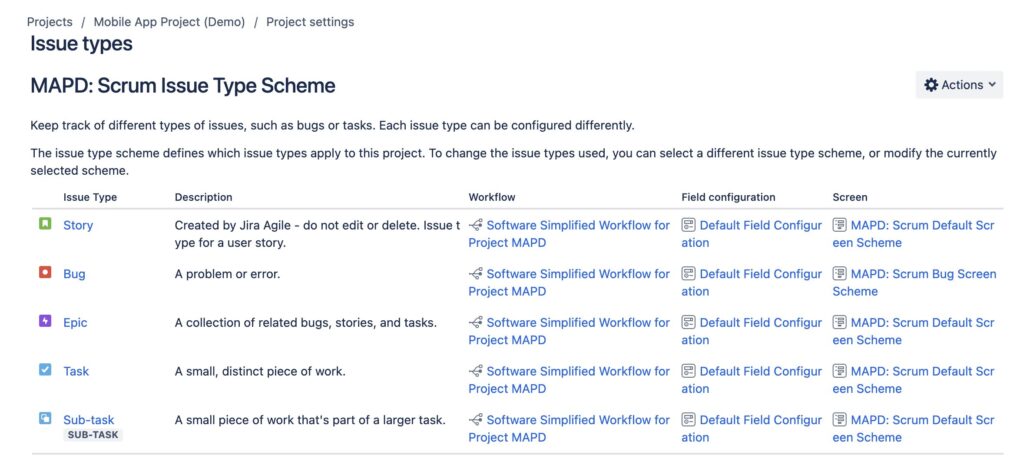
Using the right issue types helps your team stay organized and ensures that work is tracked at the right level. This way, you can see the big picture with Epics and zoom into the details with Sub-tasks, all while keeping your project on track.
=> Learn more about issue types in Jira
3. The Hierarchy of Issue Types in Jira
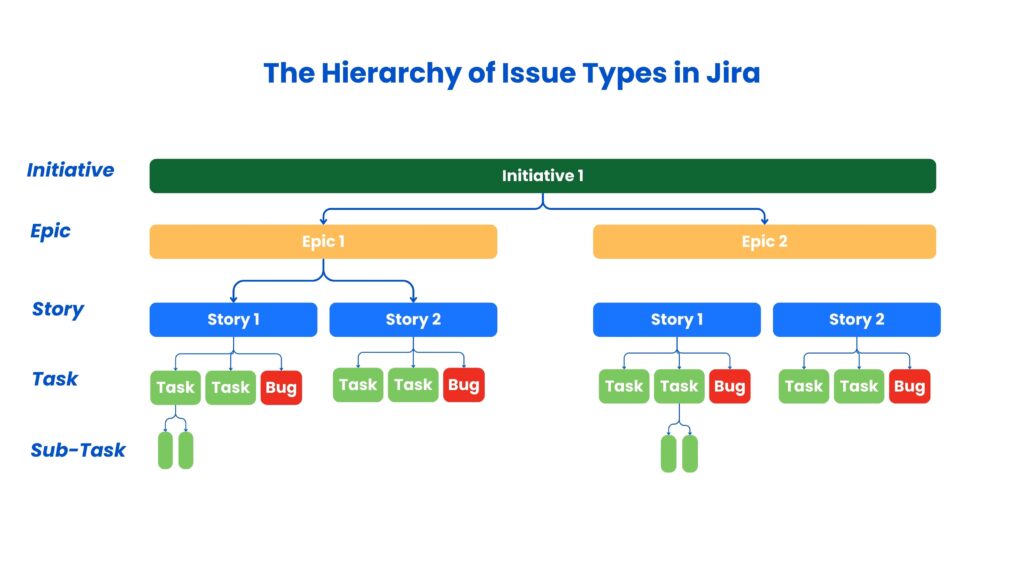
Jira issue type hierarchy helps you organize work at different levels, from big-picture initiatives down to individual tasks. This hierarchy is essential for managing complex projects, as it allows you to break down work into manageable pieces. Here’s how the hierarchy typically looks:
Initiatives:
- At the top of the hierarchy, some teams use Initiatives. Initiatives represent larger goals that span multiple Epics, such as “Expand Product Line in 2024,” which might include several Epics like “Develop New Mobile App” and “Launch Marketing Campaign for New Products.”
Note: Initiatives are only available in Jira Premium and Jira Enterprise plans. They’re used within Advanced Roadmaps, a feature that helps with long-term planning and tracking progress across multiple teams.
Epics:
- Epics sit below Initiatives and represent significant chunks of work that can be broken down further. An Epic might be “Develop New Mobile App.” Within this Epic, you’ll find Stories, Tasks, and Bugs that contribute to the overall goal.
Stories and Tasks:
- Below Epics, you have Stories and Tasks. Stories describe user requirements, like “As a user, I want to reset my password easily,” while Tasks are more general work items, such as “Update user account settings layout.” Both are actionable items that contribute to completing an Epic.
Sub-tasks:
- Sub-tasks are the smallest units of work in the hierarchy. They break down Stories or Tasks into manageable steps. For example, if the Task is “Update user account settings layout,” Sub-tasks might include “Design new layout,” “Code new layout,” and “Test new layout.”
Other Issue Types:
- Depending on your project needs and customization, Jira also offers other issue types:
- Bugs: Specifically used to track problems or errors that need fixing. For example, “Fix broken image links on the homepage.”
- Improvements: Focus on enhancing existing features, like “Optimize page loading speed.”
- Incident: Used in IT projects to track issues like “Server outage at 3 AM.”
- Service Request: Common in IT and service desk projects, such as “Request new laptop for new hire.”
- Change Request: Used to manage changes in scope or requirements, for example, “Update design specs for the new feature.”
Using the right hierarchy and issue types helps your team stay organized and ensures that work is tracked at the right level. This approach lets you see the big picture with Initiatives and Epics, while also managing detailed work through Tasks, Stories, and Sub-tasks.
Customize the hierarchy of issue types in Jira easily with TeamBoard ProScheduler.
4. Configure the issue type hierarchy
Customizing your Jira issue type hierarchy allows you to tailor Jira to better fit your team’s workflow. As a Jira administrator, you can adjust the hierarchy by changing level names, adding or removing levels, and associating different issue types with each level. It’s a powerful way to ensure that your project management setup aligns with your team’s needs. However, keep in mind that these changes will apply to all company-managed projects on your site and are only available in Jira Cloud Premium and Enterprise.
How to Access Issue Type Hierarchy Settings
To customize the issue type hierarchy, follow these steps:
- Go to Settings > Issues.
- In the left column, select Issue type hierarchy.
From here, you can view and modify the default hierarchy settings.
Modifying the Default Hierarchy Levels
By default, Jira is set up with three levels of issue type hierarchy:
- Epic (Level 1)
- Story (Level 0)
- Sub-Task (Level -1)
You can modify these levels to better match how your teams work. For example, you might want to add a new level above Epics for larger Initiatives or below Stories for more detailed task breakdowns.

Renaming a Hierarchy Level
To rename a hierarchy level:
- Click on the level name you want to rename.
- Edit the name and select Save changes.
This allows you to use terminology that best fits your team’s processes.
Adding Issue Types to the Epic Level
By default, the Epic issue type is associated with the Epic hierarchy level. In Jira Cloud Premium and Enterprise, you can add additional issue types to this level:
- Select the Jira issue types field on the Epic level.
- Choose from the list of available issue types or use the search field.
- Click Save changes.
This flexibility allows you to expand the scope of what qualifies as an Epic in your projects.
Managing Custom Hierarchy Levels
Jira Premium and Enterprise customers can create additional hierarchy levels beyond the default ones. This is particularly useful if you use Advanced Roadmaps, as it allows you to track larger initiatives and manage cross-project work.
- To create a new level:
- Select + Create level at the bottom of the list of levels.
- Name your new level and use the dropdown in the Jira issue types column to associate it with specific issue types.
- Click Save changes.
- To remove a level:
- Locate the level you want to remove.
- Click Remove in the Actions column.
- Click Save changes.
Any issue types associated with the removed level will default back to the Story level (Level 0).
Important Considerations
- Impact on Parent-Child Relationships: Changing your issue type hierarchy can break existing parent-child relationships between issues. Jira will calculate the impact of these changes and require confirmation before proceeding.
- Non-Reversible Changes: Be aware that once changes to the hierarchy are made, they cannot be undone. It’s important to fully understand the risks and impacts before modifying the structure.
- Need Help? If you encounter any issues or need guidance during this process, Jira’s support team is available to assist.
Customizing the issue type hierarchy can greatly enhance how your team manages work in Jira, but it’s essential to approach these changes carefully to avoid disruptions.
View Jira’s issue type hierarchy in Advanced Roadmaps
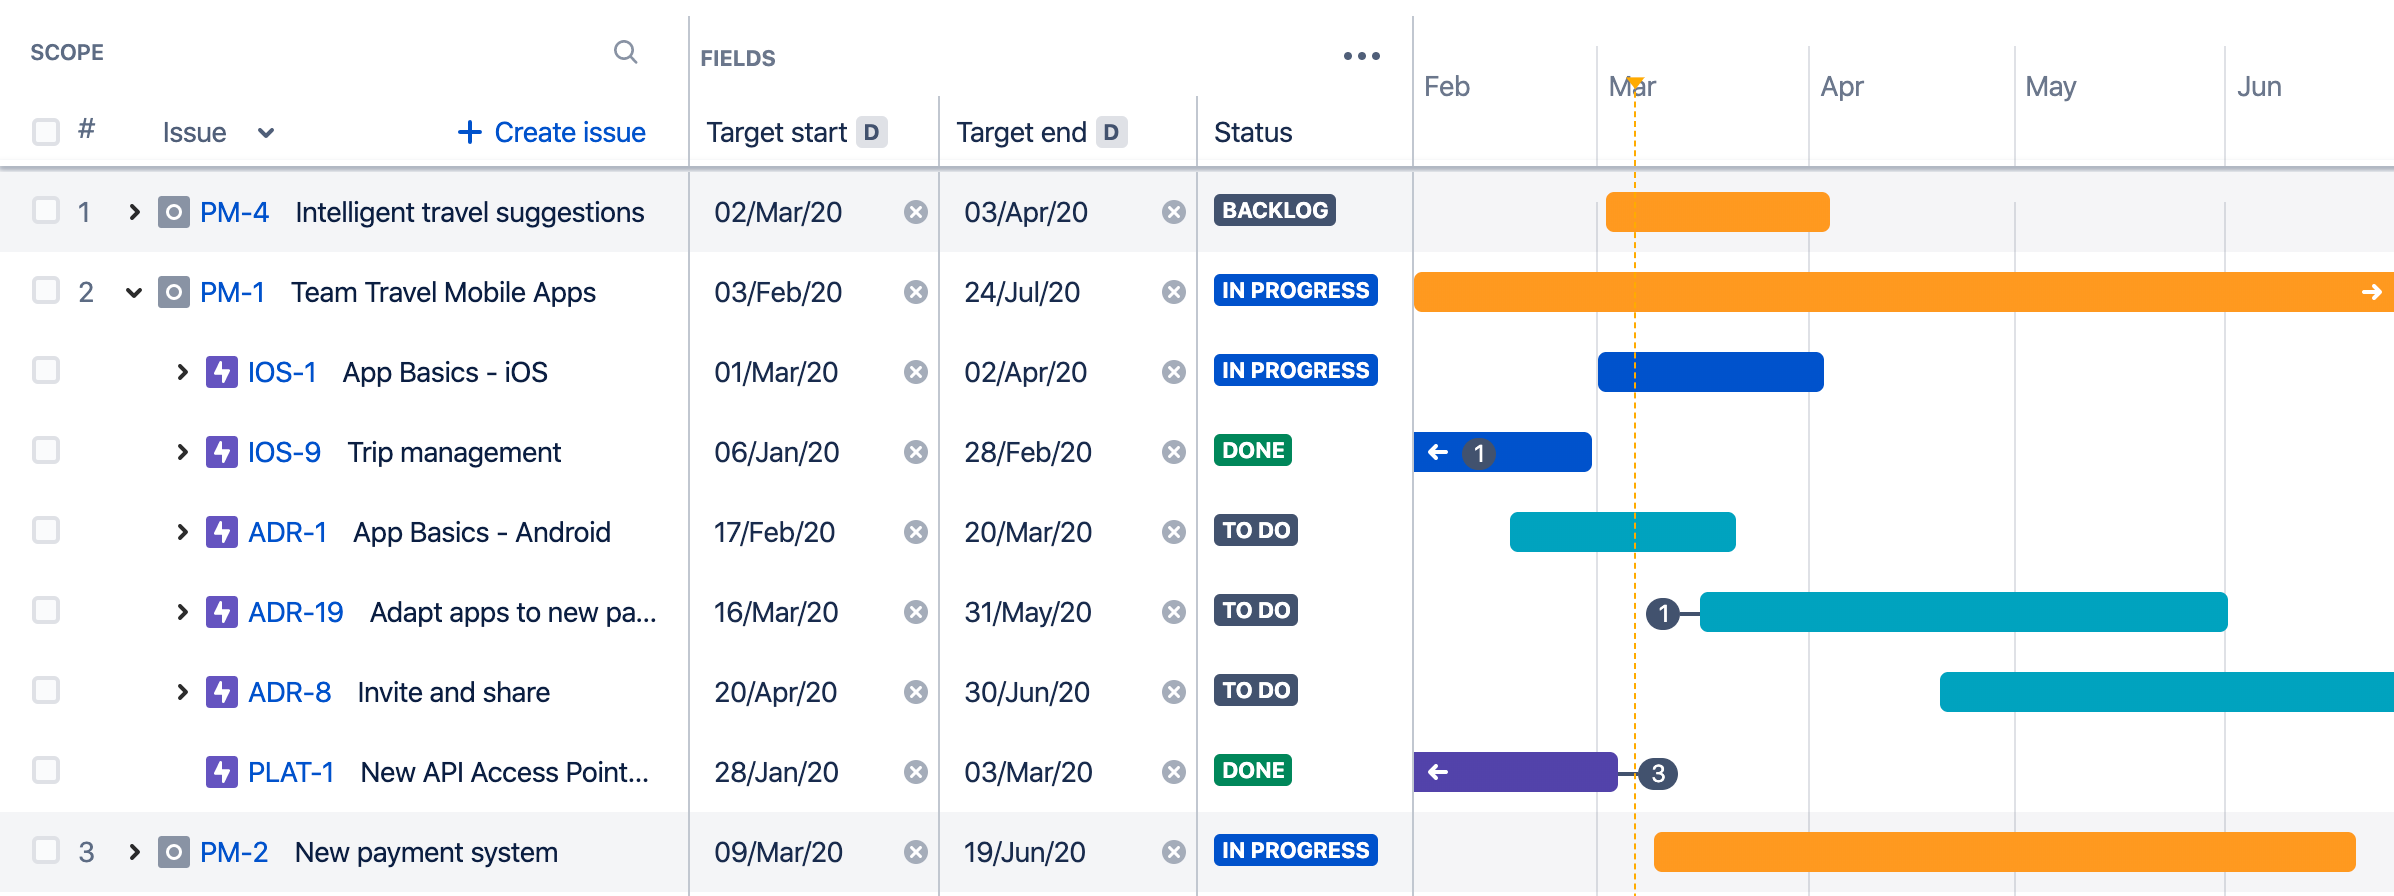
To check and view Jira’s issue type hierarchy in Advanced Roadmaps, follow these steps:
- Open Advanced Roadmaps:
- Go to your Jira project.
- Click on Plans in the top navigation bar, and select Advanced Roadmaps (or simply Roadmaps if you have a simpler setup).
- View Hierarchy Levels:
- In the roadmap view, you will see your issues organized by hierarchy levels, typically starting with Epics, followed by Stories, Tasks, and Sub-tasks.
- If you have customized the hierarchy (e.g., adding Initiatives or custom levels), these will also appear in the roadmap view.
- Expand and Collapse Hierarchy:
- Use the arrow next to each issue type to expand or collapse the view, allowing you to see the parent-child relationships across different hierarchy levels.
- Customize Hierarchy Display:
- If you need to adjust the levels shown, click on the Filters or Hierarchy settings to choose which levels are displayed on the roadmap.
- Check Custom Hierarchies:
- If you have set up custom hierarchy levels, ensure they are properly displayed by adjusting the settings in the Advanced Roadmaps configuration. You can do this by selecting Settings > Issues > Issue Type Hierarchy in Jira’s main settings.
- Track Progress:
- Use the roadmap to track the progress of each issue type across different levels, providing a clear view of how work items align with overall project goals.
These steps will help you view and manage your issue type hierarchy directly within Jira’s Advanced Roadmaps, allowing for better visualization and management of your projects. If you need any specific guidance or more details, feel free to ask!
Advanced Features and Considerations
Jira offers advanced features that can significantly enhance how you use issue types and hierarchies, especially if you’re working on complex projects or managing multiple teams. Understanding these advanced features will help you leverage Jira to its fullest potential. Here are some key advanced features and considerations:
1. Advanced Roadmaps
Advanced Roadmaps, available in Jira Premium and Enterprise plans, allow you to plan, track, and manage work across multiple teams and projects. By adding additional hierarchy levels, like Initiatives or Goals, you can see how all work items connect, from high-level strategic goals down to individual tasks. This feature is especially useful for long-term planning and ensuring alignment across the organization.
Key Considerations:
- Hierarchy Alignment: Make sure your custom hierarchy levels align with how your teams work. For example, using Initiatives to represent company-wide goals helps teams see their work in the context of larger objectives.
- Dependencies and Timelines: Use Advanced Roadmaps to map out dependencies and timelines, helping to identify potential bottlenecks early on.
2. Linking Issues and Creating Dependencies
Jira allows you to link issues and create dependencies, which is essential for managing complex workflows. You can set relationships like “blocks,” “is blocked by,” “relates to,” or “duplicates” between issues. This feature helps in visualizing how work items are connected and identifying any potential blockers.
Key Considerations:
- Visualizing Dependencies: Utilize Gantt charts or roadmap views to visualize dependencies between issues, making it easier to manage project timelines and resources.
- Maintaining Clarity: Be mindful of creating too many dependencies, as it can make your project plan overly complex and harder to manage.
3. Automation Rules
Automation rules in Jira can save time and reduce manual work by automating repetitive tasks. For example, you can set up rules to automatically transition issues when certain conditions are met, like moving a Task to “Done” when all its Sub-tasks are completed.
Key Considerations:
- Trigger-Based Actions: Use triggers like status changes, field updates, or time-based triggers to automate processes within your project.
- Avoid Over-Automation: While automation is powerful, over-automating can lead to confusion if team members are unsure why certain actions occurred. Keep automation rules clear and well-documented.
4. Integrations with Other Tools
Jira integrates with a wide range of other tools, including Confluence, Bitbucket, Slack, and more. These integrations can enhance your use of issue types by connecting work across platforms. For example, linking Jira issues to Confluence pages can provide additional context and documentation directly within your issues.
Key Considerations:
- Unified Workflows: Use integrations to create a unified workflow where information flows seamlessly between tools. This reduces context-switching and improves efficiency.
- Data Sync: Ensure that data is consistently synced across tools to prevent discrepancies and maintain an accurate view of project status.
5. Reporting and Dashboards
Jira’s reporting and dashboard features allow you to track progress at all levels of the hierarchy. You can create custom reports and dashboards that display information such as the number of open issues by type, progress on Epics, or overall project health.
Key Considerations:
- Custom Reports: Use filters and custom fields to tailor reports to your needs, providing insights that are specific to your team’s workflow.
- Visualization Tools: Utilize charts, graphs, and other visualization tools in Jira dashboards to present data in an easily digestible format for stakeholders.
6. Permissions and Security
As your Jira setup becomes more complex with custom issue types and hierarchies, managing permissions becomes increasingly important. Ensure that the right people have access to the right levels of information, and restrict access to sensitive data where necessary.
Key Considerations:
- Role-Based Access: Set permissions based on roles to ensure that users only have access to relevant information and actions.
- Audit and Review: Regularly audit permissions and access levels to maintain security and compliance, especially in larger organizations.
FAQs on Jira Issue Type Hierarchy
How many levels can I add to the issue type hierarchy?
In Jira Cloud Premium and Enterprise, you can add multiple custom levels above or below the default levels (Epic, Story, Sub-task). For example, you might add levels like “Initiatives” above Epics to track larger goals, or create additional detailed levels below Stories for more granularity.
Can I add custom issue types to the Epic level?
Yes, in Jira Cloud Premium and Enterprise, you can add custom issue types to the Epic level or any other level in the hierarchy. To do this, go to the Epic level settings and select the Jira issue types you want to associate with that level, then save your changes.
Will customizing the hierarchy affect my existing projects?
Yes, customizing the hierarchy affects all company-managed projects in your Jira site. This means any changes you make will be reflected across all projects, which can impact how issues are managed and reported. Always consider the broader implications of any hierarchy changes.
Can I undo changes made to the issue type hierarchy?
No, once changes are made to the issue type hierarchy, they cannot be undone. This is why it’s crucial to thoroughly understand the impact of any modifications before proceeding and to confirm that the changes will support your project’s needs.
Why are Initiatives not showing up in my Jira instance?
Initiatives and additional hierarchy levels above Epics are only available in Jira Cloud Premium and Enterprise plans. If you’re using a standard plan, these advanced hierarchy options won’t be available. Consider upgrading if your team needs these features for better long-term planning and project management.
Can I have different hierarchies for different projects?
No, the issue type hierarchy is global across all company-managed projects in your Jira site. This means any changes you make will affect all projects. However, you can use custom issue types and configure workflows to adapt to specific project requirements within the shared hierarchy structure.
Is it possible to restrict certain issue types to specific projects?
While the hierarchy itself is global, you can control which issue types are available in specific projects by configuring issue type schemes. These schemes allow you to decide which issue types should be available in each project, helping you manage work items that are specific to particular teams or workflows.
Can I use issue type hierarchy with Agile boards?
Yes, the issue type hierarchy works well with Agile boards like Scrum and Kanban in Jira. For example, Epics can be visualized on a roadmap, Stories can populate your backlog, and Sub-tasks can be managed within sprints. Understanding and using the hierarchy correctly can enhance your Agile workflow, making it easier to track progress at every level of your project.
Jira’s issue type hierarchy helps you organize and manage work effectively. By customizing the hierarchy, you can tailor Jira to suit your team’s needs, but make changes carefully since they impact all projects. Keep your setup simple and focused on what adds value. Regular reviews will ensure it continues to support your goals, making project management smoother and more efficient.

