If you’re using Jira for project management, you know that it’s a powerful PM tool with a lot of features. One of the most helpful features is bulk changes, which lets you edit multiple issues at once, saving you a ton of time and effort. In this blog post, we’ll show you how to use bulk changes in Jira to manage your projects more efficiently.

What Are Bulk Changes in Jira?
Bulk changes in Jira are a way to edit multiple issues quickly and easily. You can update different aspects of an issue, like fields, assignees, and statuses, all at the same time. This is a great feature when you need to make changes to a large number of issues.
It’s important to note that there are restrictions placed on some of the bulk operations.
For example, if you select multiple issues with different workflows, you can only transition them in groups with the same workflow, and one group at a time. Additionally, you can only bulk change up to 1000 issues at a time as loading more than that might result in the “Out Of Memory” error. The restrictions are explained further in the relevant sections.
Benefits of Using Bulk Changes in Jira
The biggest benefit of using bulk changes in Jira is that it saves you time and effort. Instead of editing each issue individually, you can make the same change to multiple issues at once. This is especially useful when you have a long list of issues to update.
Another benefit of using bulk changes is that it ensures consistency across your project. When you make changes to multiple issues at once, you can be sure that they all get updated in the same way. This is important for maintaining the integrity of your project.
How to Use Bulk Changes in Jira
Using bulk changes in Jira is easy. Here’s how to do it:
- Select “Issues” from the left sidebar: This will take you to the issues page, where you can see all the issues in your project.
- Select the project and issues you want to change: You can use filters or search criteria to narrow down the list of issues to the ones you want to update.
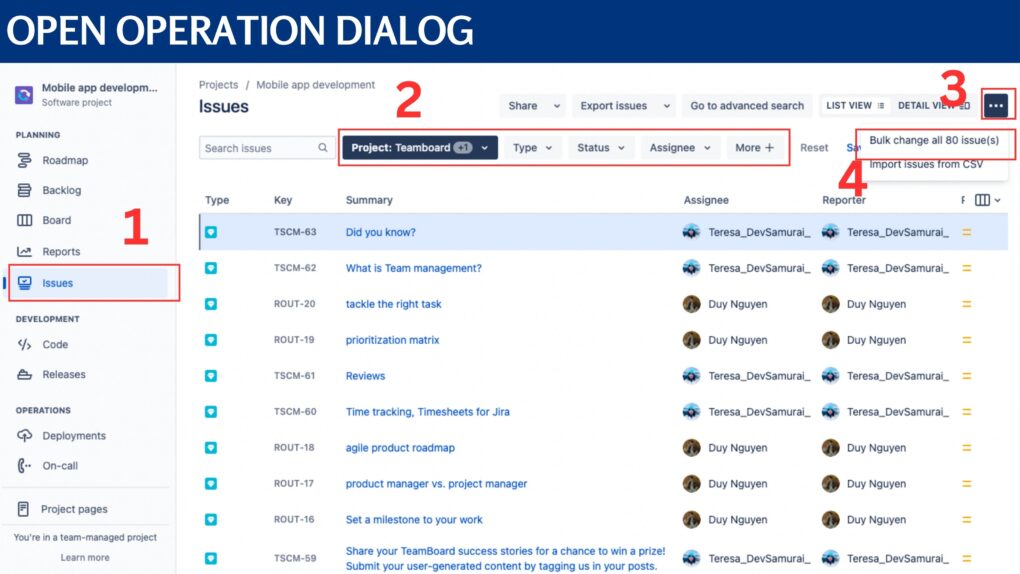
- Click on the three dots (…) then click “Bulk Change”: This will open the Bulk Operation dialog box.

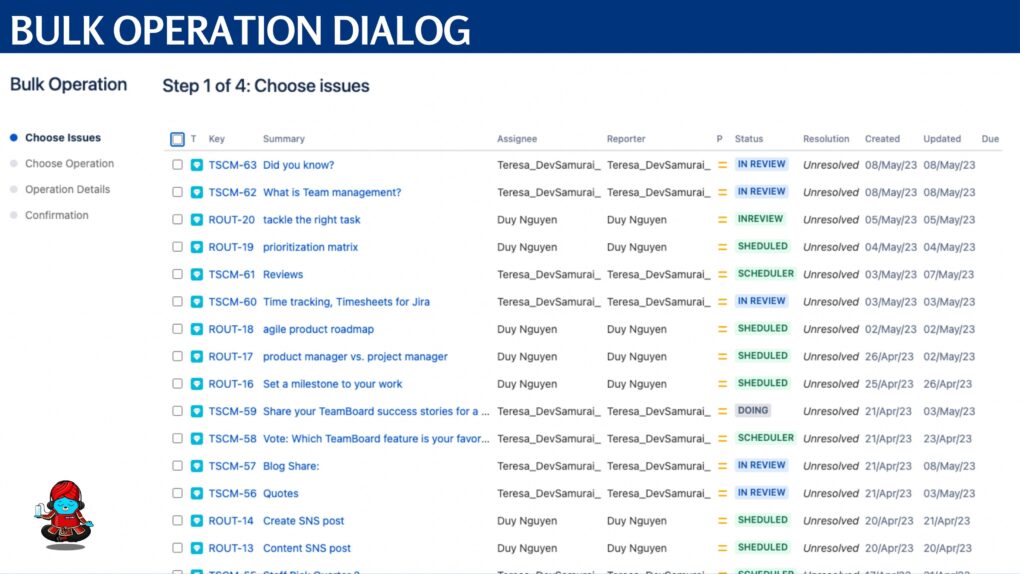
Open Operation dialog - Choose the issues you want to update: You can choose individual issues or use filters to select multiple issues at once.
Bulk Operation dialog - Choose the operation you want to perform: You can update fields, assignees, statuses, and more.
- Provide the operation details: Depending on the operation you’ve chosen, you may need to provide additional information.
- Preview your changes: Before you apply your changes, you can preview them to make sure they’re correct.
- Confirm your changes: Once you’re happy with your changes, click the “Confirm” button to apply them to all of the selected issues.
Bulk Operation dialog
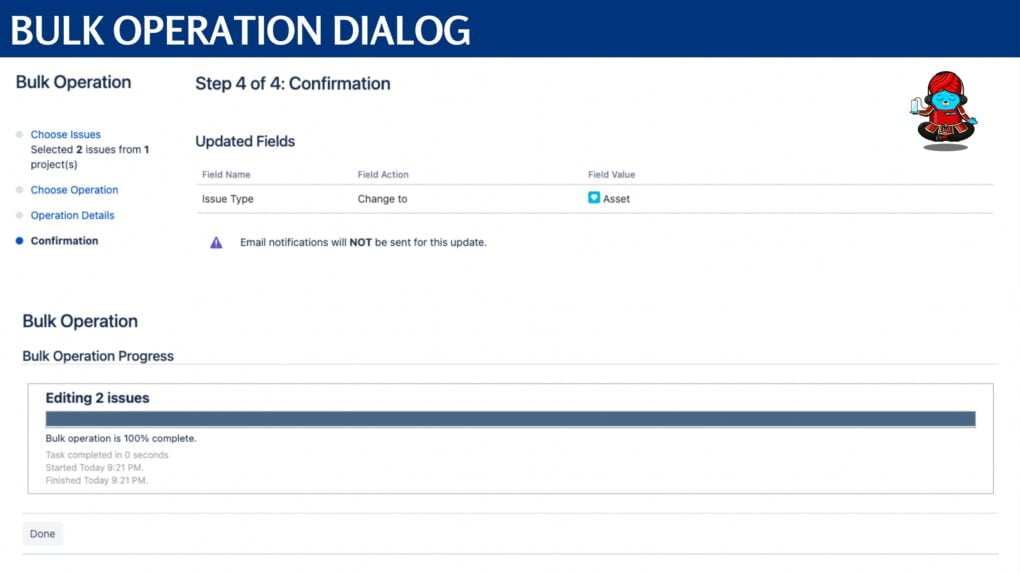
Wait until all issues have been processed before closing the dialog, or the remaining issues will not be edited.
By following these steps, you can quickly and easily make bulk changes to multiple issues in Jira. Remember to plan your changes carefully, preview your changes before applying them, and test your changes to make sure they’re working properly.
Information you can edit at the same time
Bulk changes in Jira allow you to make changes to multiple issues at once. You can edit various aspects of an issue, such as fields, assignees, and statuses. Here are some examples of the information you can edit using bulk changes in Jira, along with the requirements for each:
- Change Affects Version/s: The selected issues must belong to one project, and that project must have version/s. This field must not be hidden in any field configurations that the selected issues belong to. The current user must have ‘edit issue’ permission for all the selected issues.
- Change Assign To: This field must not be hidden in any field configurations that the selected issues belong to. The current user must have ‘assign issue’ permission for all the selected issues.
- Change Comment: This field must not be hidden in any field configurations that the selected issues belong to. The current user must have ‘comment issue’ permission for all the selected issues.
- Change Component/s: The selected issues must belong to one project, and that project must have component/s. This field must not be hidden in any field configurations that the selected issues belong to. The current user must have ‘edit issue’ permission for all the selected issues.
- Change Due Date: This field must not be hidden in any field configurations that the selected issues belong to. The current user must have ‘edit issue’ permission for all the selected issues, as well as ‘schedule issue’ permission for all the selected issues.
- Change Fix For Version/s: The selected issues must belong to one project, and that project must have version/s. This field must not be hidden in any field configurations that the selected issues belong to. The current user must have ‘edit issue’ permission for all the selected issues.
- Change Issue Type: The current user must have ‘edit issue’ permission for all the selected issues.
- Change Priority: This field must not be hidden in any field configurations that the selected issues belong to. The current user must have ‘edit issue’ permission for all the selected issues.
- Change Reporter: This field must not be hidden in any field configurations that the selected issues belong to. The current user must have ‘edit issue’ permission for all the selected issues, as well as ‘modify reporter’ permission for all the selected issues.
- Change Security Level: This field must not be hidden in any field configurations that the selected issues belong to. All the selected projects must be assigned the same issue-level security scheme. The current user must have ‘edit issue’ permission for all the selected issues, as well as ‘set issue security’ permission for all the selected issues.
- Change Custom Fields: This operation is available only if a global custom field exists, an issue type custom field exists and the issues are all of this specific issue type, or a project custom field exists and the issues are all of the same project.
- Edit a Closed Issue: Your workflow must allow editing of closed issues.
- Change Organization: This operation is available only for Jira Service Management. The issues must be in the same project, and you must have the agent role for the project.
- Change Sprint: You need to specify the sprint ID. This operation only affects active and future sprints, i.e. closed/completed sprints are not included when bulk editing the Sprint field.
Unavailable Operations for Bulk Changes in Jira
While bulk changes in Jira allow you to make changes to multiple issues at once, there are some fields that cannot be edited using this method. These fields either have an alternative method or it is not logical to perform bulk editing on them. Here are some examples of system fields that are unavailable for bulk editing:
- Attachments: You cannot add or remove attachments from multiple issues using bulk changes.
- Summary: You cannot change the summary of multiple issues using bulk changes.
- Description: You cannot change the description of multiple issues using bulk changes.
- Environment: You cannot change the environment of multiple issues using bulk changes.
- Project: You cannot change the project of multiple issues using bulk changes. Instead, you can use the “Bulk Move” operation to move issues between projects.
- Resolution: You cannot change the resolution of multiple issues using bulk changes. Instead, you can use the “Bulk Workflow Transitions” operation to modify the resolution of issues.
- Time Tracking Fields: You cannot change the original estimate, remaining estimate, or time spent on multiple issues using bulk changes.
In addition to system fields, some custom field types are also unavailable for bulk editing. These include:
- Import Id: You cannot edit the import ID of multiple issues using bulk changes.
- Read-only Text: You cannot edit read-only text fields of multiple issues using bulk changes.
- Labels: Labels cannot be edited using bulk changes and must be updated individually within each issue. To resolve this, you can try Advanced Label Manager for Jira.

By using bulk changes in Jira, you can save time and effort while maintaining consistency and accuracy across your project. By understanding the information you can edit using bulk changes and the requirements for each, you can make efficient and effective changes to multiple issues at once. Remember to preview your changes before applying them, test your changes to make sure they’re working properly, and seek help from your project administrator if you encounter any issues. With these tips in mind, you can become a Jira guru and streamline your workflow for maximum productivity.
About DevSamurai
DevSamurai is a Global IT service company that provides DevOps solutions for Jira, Atlassian and more… using cutting-edge technology for its growing customer base. DevSamurai is customer-centric and helps clients to leverage the power of IT to improve their business. DevSamurai uses cloud computing platforms, DevOps tools, and best practices in global industry standards to guarantee the efficiency of their client’s organization.
If you want even more apps to manage your project, check out these resources: Atlassian Marketplace