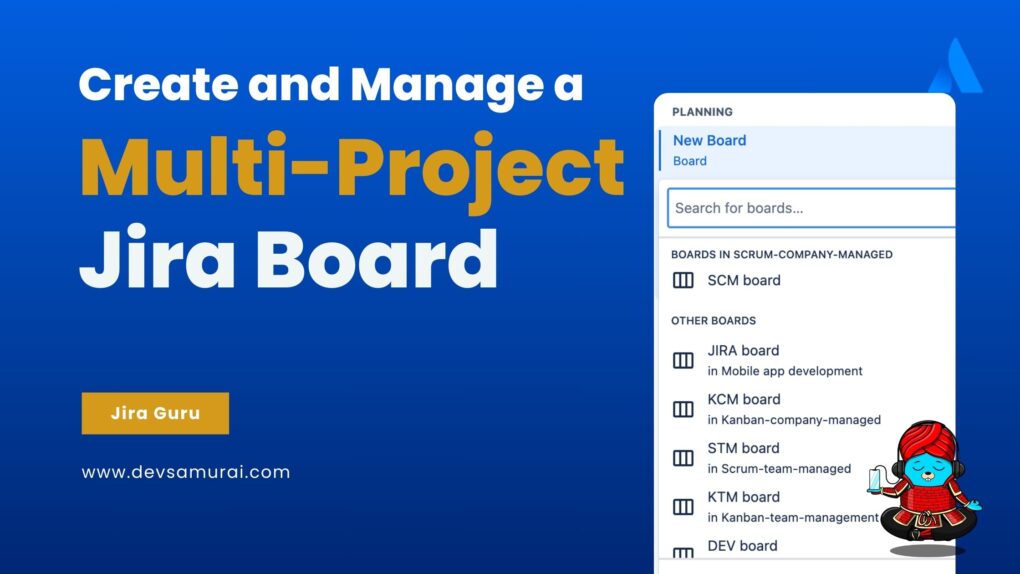
Did you know that Jira’s capabilities extend beyond managing individual projects? Indeed, with the right know-how, you can oversee multiple projects within a single Jira board, making it easier to get a holistic view of your project’s status and interdependencies. In this blog post, we’ll delve deep into the intricacies of creating and managing a multi-project Jira board, offering a step-by-step guide to maximize its potential. Whether you’re a seasoned Jira user or a newcomer looking to elevate your project management game, this guide has got you covered. Let’s dive in!
Understanding Jira Boards, Multi-Project Jira Board
1. What is a Jira Board?
A Jira board is a visual representation of the workflow and tasks associated with specific projects or filters. It provides a snapshot of where various tasks stand in a workflow, allowing teams to quickly understand the status, who’s working on what, and what’s up next.
2. Types of Boards in Jira:
There are primarily two types of boards in Jira:
a. Kanban Board:
- Origin: Stemming from the Japanese term for “visual signal” or “card”, Kanban focuses on visualizing the workflow and limiting the amount of work in progress.
- Usage: It’s best for teams that want a visual representation of their work but don’t work in iterations. Tasks move from one column to the next (for example: To Do, In Progress, Done) as they progress.
- Features: It includes features like the Kanban backlog and the WIP (Work In Progress) limits.
b. Scrum Board:
- Origin: Rooted in the Scrum framework, which emphasizes iterative progress, team collaboration, and adaptability.
- Usage: Ideal for teams that work in sprints or iterations. It divides work into set time frames and has specific roles like Scrum Master and Product Owner.
- Features: It emphasizes the backlog, sprint planning, and includes burndown charts to show progress.
While Jira boards are powerful for managing workflows, integrating AgileTest – Test Case Management for Jira takes your test management to the next level, especially in multi-project setups. With AgileTest, you can track test cases, execution statuses, and defects across multiple projects, all while maintaining a clear overview of progress on a single board.
Pre-requisites for Setting Up a Multi-Project Jira Board
1. Required Permissions:
- Board Creation: You need the ‘Create Shared Objects’ global permission. If you don’t have this permission, you’ll only be able to create a private board.
- Project Access: Ensure you have access to all the projects you wish to include in the multi-project board. Without the necessary permissions, you won’t be able to view or manage issues from those projects.
2. Necessary Configurations and Settings:
- Jira Software Access: Ensure you have Jira Software access. Jira Core users won’t be able to create or work with boards.
- Updated Jira Version: Ensure you’re working with an updated version of Jira. Some features, especially related to multi-project boards, might be limited or absent in older versions
Step-by-Step Guide to Creating and Managing a Multi-Project Jira Board
This guide applies to Company-managed project
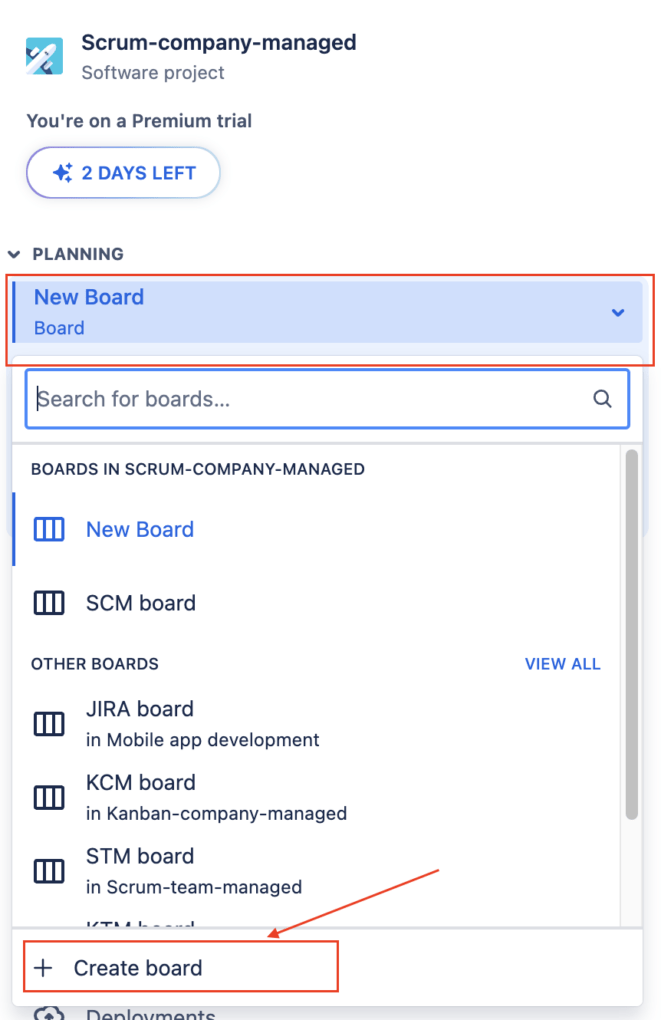
Creating a New Board:
1. Open Your Jira Project
2. Click on “Boards” in the project menu.
3. Click “Create board”.
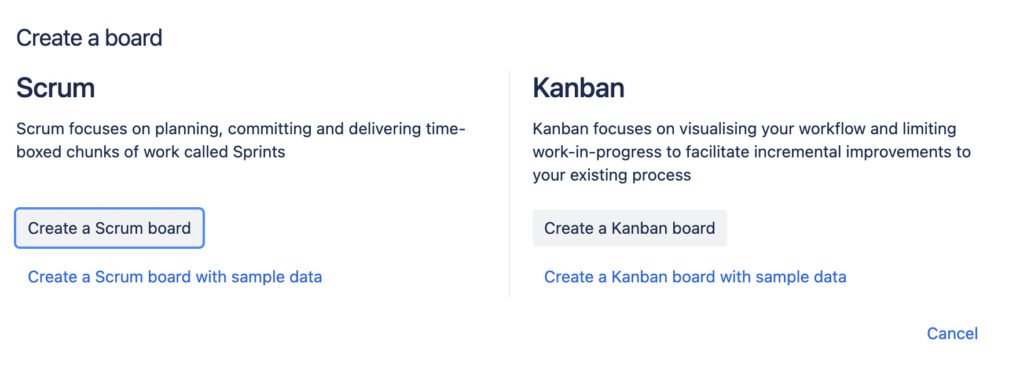
4. Select Scrum or Kanban.
5. Pick “Board from an Existing Project”.
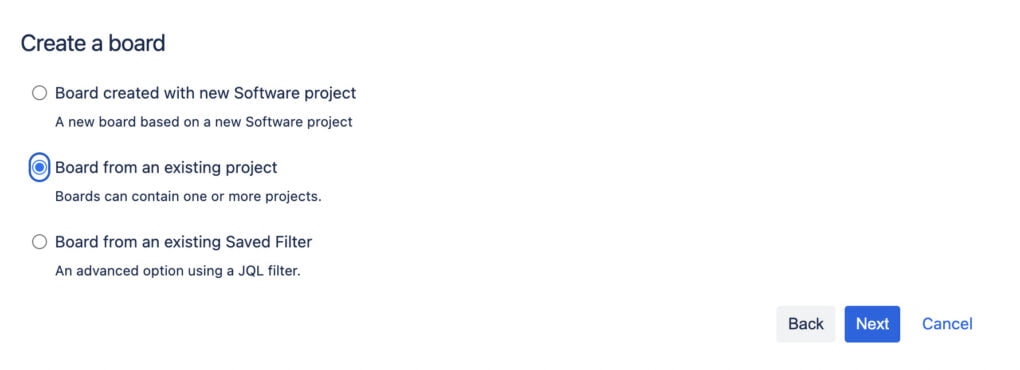
6. Click “Next”.
7. Assign a name to your board.
8. Select projects for the board.
9. Set the board’s location within Jira.
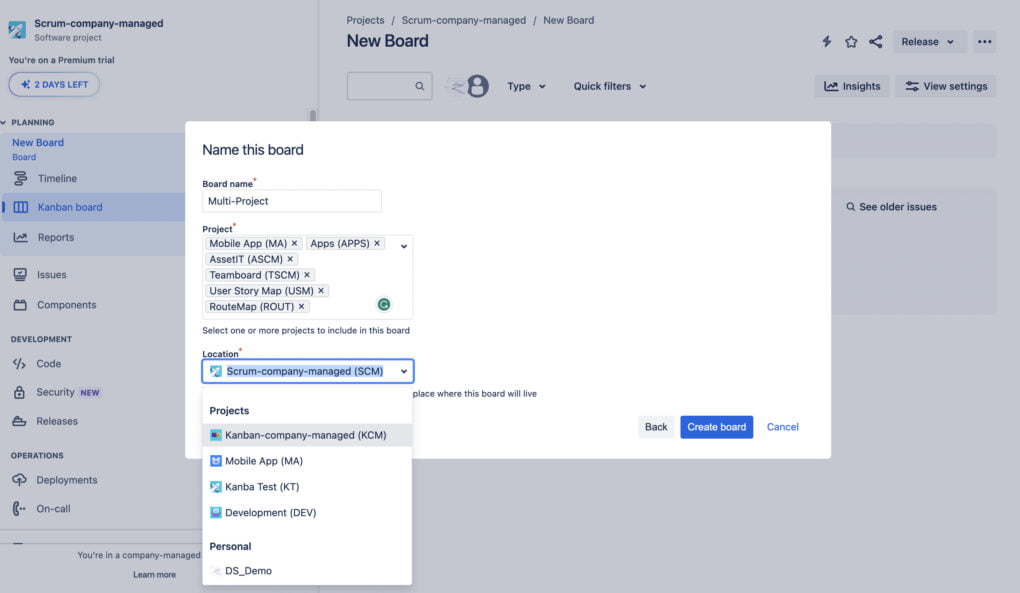
10. Click “Create board”.
*Kanban: Ideal for teams with continuous workflows.
*Scrum: Perfect for teams working in iterations or sprints.
Tips and Tricks
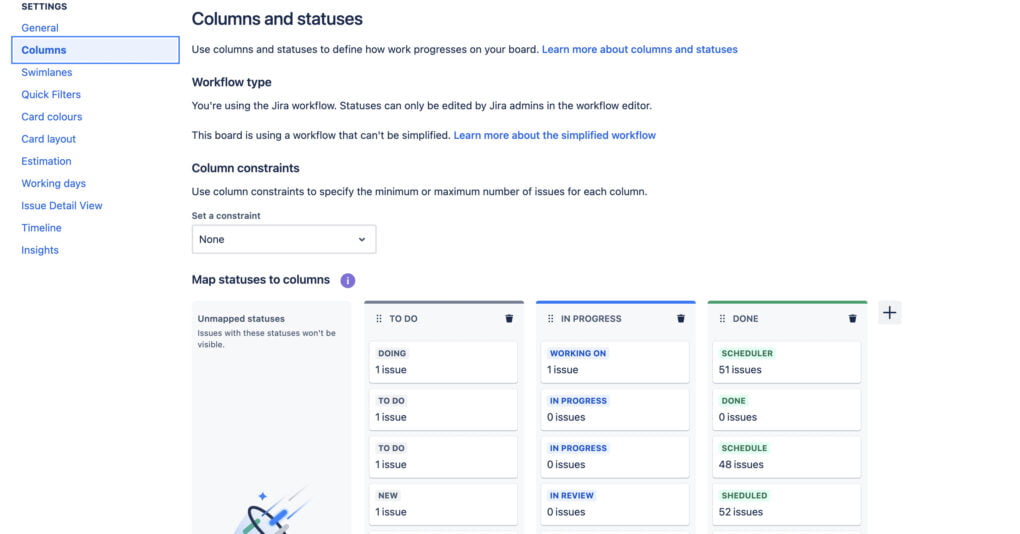
Setting Up Columns and Workflows
- Navigate to the “Columns” tab.
- Here, you can add, rename, or remove columns based on your project’s workflow. Each column represents a stage in your workflow.
- Drag and drop statuses into the appropriate columns. For instance, if you have statuses like “To Do”, “In Progress”, and “Done”, align them with the corresponding columns.
- Once satisfied, the changes will automatically be reflected on your board.
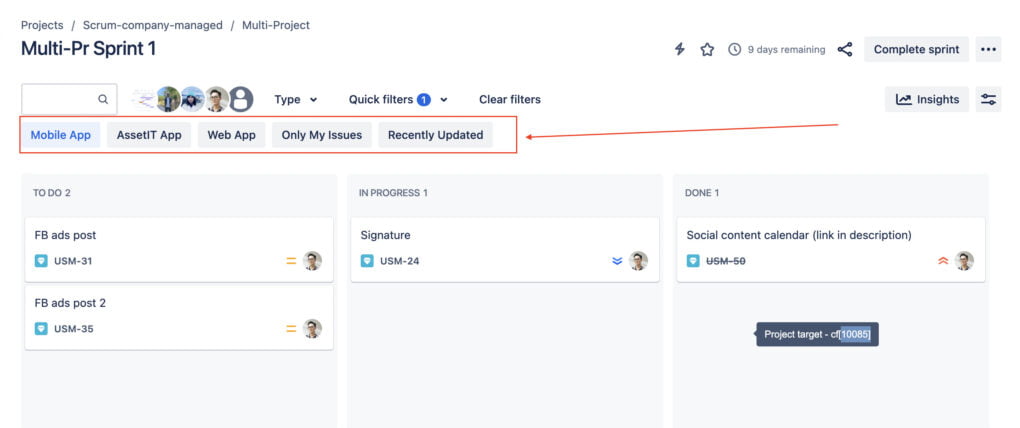
Configuring Board Filters
1.Once the board is created, click on “Board” in the top right corner and select “Configure”.
2. Click on the “Quick Filter” option.
3. Click the “Add Filter” button.
4. Name the filter for easy identification.
5. Add a JQL (Jira Query Language) query to define the filter’s criteria. For example, to create a filter for project:
- project = “Project A”
- project = “Project B”
- project = “Project C”
6. Return to your board. The new quick filter will be available at the top of the board, allowing you to easily toggle between views.
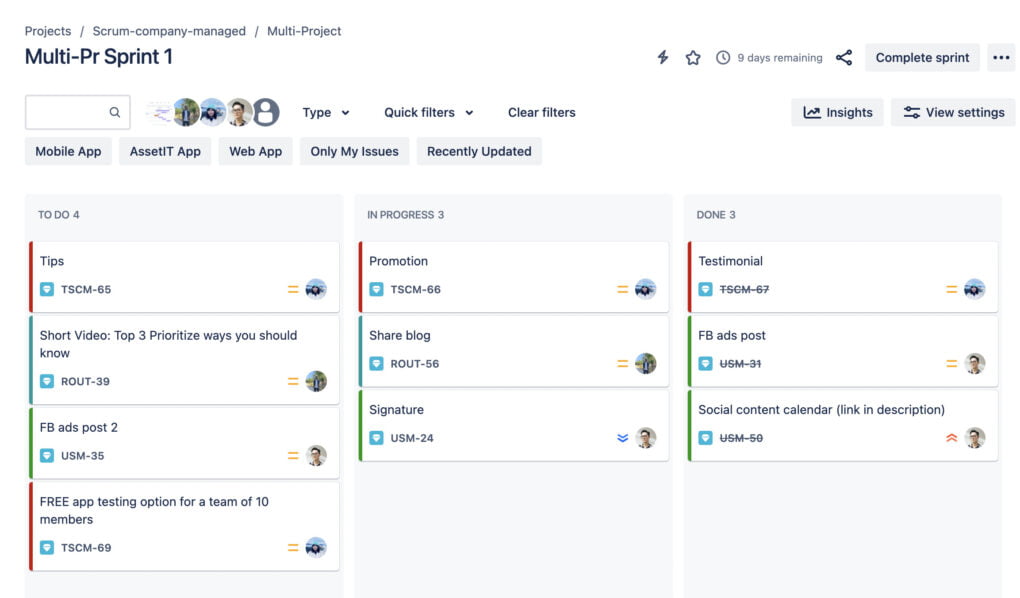
Use Color-Coding
Assign different colors to tasks from different projects.
Benefit: At a glance, you can distinguish which project a task belongs to, making the board visually organized.
Example: Let’s say you have three projects: Mobile App, Web Development, and Marketing. Assign blue for Mobile App tasks, green for Web Development, and red for Marketing. Jira allows you to color-code issues based on queries. By going to Board Settings -> Card Colors, you can set up colors based on JQL queries.
Bulk Changes
Familiarize yourself with the “Bulk Change” feature to modify several issues at once.
Benefit: Save time and ensure consistency when making similar updates to multiple tasks.
Example: If you want to update the assignee for all tasks under a certain epic or tag, instead of doing it individually, use the bulk change.
Keyboard Shortcuts:
Learn and use Jira’s keyboard shortcuts for quick navigation and task management.
Benefit: Speed up common actions and reduce mouse clicks.
Example: To quickly create a new issue, just press “c”. To comment on a selected issue, press “m”.
You can view all shortcuts in Jira by pressing “.” (dot) on your keyboard.
Consistent Naming Conventions:
Adopt consistent naming conventions across projects.
Benefit: Ensures clarity and prevents confusion when viewing tasks from different projects together.
Example: If you’re naming tasks for the Mobile App project like “MA- Design Update”, do something similar for Web Development, like “WD- Frontend Bug“.
This ensures that when you see a task, you instantly know its project based on the prefix.
Use Dashboards:
Set up personalized Jira dashboards with gadgets showing crucial metrics and overviews from your multi-project board.
Benefit: Get quick insights and a bird’s-eye view of project progress.
Example: Create a dashboard widget to see the burndown chart of your current sprint.
When setting up a new dashboard, you can add gadgets like Sprint Burndown to visualize your data.
Linking Issues:
Use the “Link Issue” feature to connect related tasks across different projects.
Benefit: Easily track dependencies or related work between projects.
Example: Link a task in the Web Development project as a “blocker” to a task in the Marketing project.
Inside a task, use the “More -> Link” option. Choose the type of link (e.g., “blocks”) and then select the issue you want to link to.
Regular Backlog Refinement:
Schedule regular backlog grooming sessions.
Benefit: Keeps the board manageable, ensures tasks are up to date, and aids in effective sprint planning.
Example: In your bi-weekly refinement session, prioritize and estimate the efforts of the tasks for the upcoming sprint.
Regular grooming ensures that the team isn’t overwhelmed and that tasks in the backlog are relevant and up to date.
Star Your Boards:
Use the “Star” feature to mark important boards for quicker access.
Benefit: Save time by having your most important boards readily accessible.
Example: If you constantly switch between the “Design” board and the “Development” board, star them for quick access. On the main board page, hover over the board name and click the star icon.
Stay Updated with Plugins:
Explore the Atlassian Marketplace for plugins that can enhance multi-project management.
Benefit: Leverage additional functionalities and integrations that Jira’s native features might not offer.
Example: If your team want to schedule task in calendar view, gantt chart or timeline for some tasks, consider getting a plugin that syncs Task with Jira. The Atlassian Marketplace offers myriad plugins. Always review and test a plugin in a safe environment before deploying it to the main board.
Challenges and Pitfalls to Avoid
1. Overcomplication:
- Pitfall: Adding too many columns, statuses, custom fields, or rules can make the board complex and harder to navigate.
- Solution: Keep the board as simple as possible. Only introduce complexities if they add clear value.
2. Loss of Project Identity:
- Pitfall: When multiple projects are merged onto one board, individual project identities can become blurred.
- Solution: Use consistent labeling, color-coding, or swimlanes for each project to maintain clear separation and identification.
3. Inconsistent Workflows:
- Pitfall: Different projects might have different workflows, causing confusion when merged onto a single board.
- Solution: Adopt a standardized workflow across projects or use board configurations to map different project statuses to unified columns.
4. Overloading the Board:
- Pitfall: Trying to fit all tasks from all projects onto the board can result in an overwhelming number of cards.
- Solution: Regularly groom and prioritize the backlog. Consider implementing Work In Progress (WIP) limits.
5. Permission Issues:
- Pitfall: Without clear permissions, team members might mistakenly alter tasks from projects they’re not involved in.
- Solution: Set up clear role-based permissions ensuring only relevant members can edit tasks from specific projects.
6. Inefficient Notifications:
- Pitfall: Team members getting notifications for every task on a multi-project board can lead to notification fatigue.
- Solution: Customize notification schemes to ensure team members only receive updates relevant to their projects and roles.
7. Over-reliance on Automation:
- Pitfall: While automations can streamline processes, over-relying on them without understanding can cause unintended changes.
- Solution: Ensure the team understands the automations set up and monitor them regularly for any unexpected behavior.
The ability to oversee several projects on a unified platform not only enhances visibility but also streamlines workflows, improving overall productivity. An effectively managed multi-project board serves as a central hub, providing a clear overview of progress, priorities, and potential bottlenecks across projects.
No two teams or projects are alike, and what works best for one might not be suitable for another. Therefore, it’s vital to approach Jira board configurations with an open mind. Experiment with different setups, gather feedback, and continuously refine your board to best serve your team’s unique needs. Remember, the ultimate goal is to create a board that facilitates smooth project transitions, clear communication, and efficient task management.
Additional Resources
Links to Jira Documentation and Tutorials:
Suggested Reading for Advanced Jira Board Configurations and Strategies:
- Jira JQL | Searching for what you need in Jira like Pro
- Jira Terms and Definitions
- Configure a company-managed board in Jira
ROUTEMAP | Portfolio Roadmaps, Timeline Gantt-chart & Kanban for Jira

Strategic portfolio management, project management, product discovery, release planning, sprint planning kanban & prioritization. Routemap enhances your workflow and productivity with Advanced Roadmaps & Prioritization for Jira and Confluence. Learn more about Routemap