One of the coolest things about Jira is its automation feature. This means you can set up Jira to do some tasks automatically! This saves time and helps everyone work smoothly. In this article of the Jira Guru Series, we’ll talk about how to set up these automatic tasks, which Jira calls “automation rules.” Plus, we’ll share five really useful rules you might want to try. Whether you’ve used Jira for a long time or you’re just getting started, this guide will have something helpful for you.

Understanding Jira Automation
Jira is like a big digital board where teams can track their work. Each task or job is like a card on this board. Now, imagine if some of these cards could move or update themselves without you having to do anything. That’s what Jira Automation does!
In simpler terms:
What is Jira Automation? It’s a feature in Jira that lets you set tasks to happen automatically. For example, you can make a card move to a ‘done’ column when someone finishes a job.
Why is it helpful? Think of all the small tasks you do over and over again. With automation, Jira can do these for you. This means you spend less time on boring stuff and more time on important work.
Jira Automation can be like your little helper in the background, making sure everything runs smoothly. And the best part? Once you set it up, it just works on its own!
Key Components of Jira Automation
Rules
Think of rules as the recipe for what you want Jira to do automatically. You set some criteria, and when these are met, something happens in your system. It’s like telling Jira, “When THIS happens, and IF these things are true, THEN do this.”
Rules have three components, which define what happens and when:
Triggers:
In Jira, triggers are like watchful sentinels. They wait for specific things to happen and, when they do, they tell Jira to get moving with the set rules. Some common triggers are
- Field value changed: When details in a task change.
- Form submitted: If there’s a form in a task and someone fills it out.
- Incoming webhook: This is like a doorbell. Someone from outside (like another app) tells Jira to start a rule.
- Issue assigned: When a task gets a new person in charge.
- Issue created or deleted: When a new task is made or an old one is removed.
- Issue linked or unlinked: When tasks are connected or disconnected.
- Issue moved: Imagine moving a task card from one board to another.
- Issue transitioned: When a task moves from one step to another, like from “doing” to “done”.
- Issue updated or commented: When there are changes to the task or someone leaves a note on it.
- Work logged: If someone notes down their work hours.
- Sprint/Version events: When project phases or versions start, finish, or are made.
- Manual: Someone tells Jira, “Do this rule now!”
- Multiple issue events: When more than one thing happens to a task.
- Scheduled: Jira has a set date and time to start the rule, like an alarm

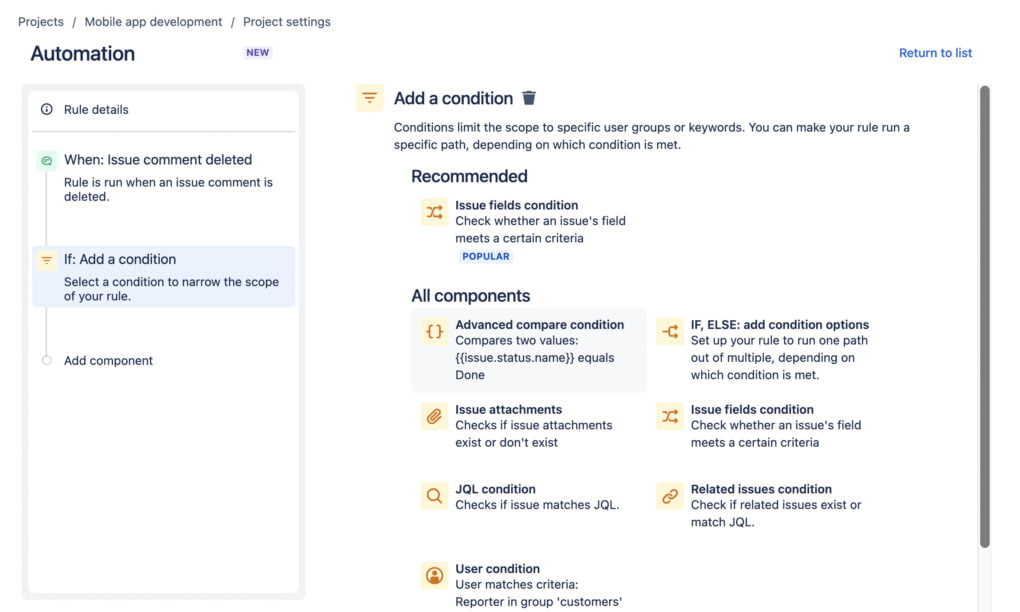
Conditions:
Jira’s checklist. Makes sure certain criteria are met before acting.
Issue Fields: Jira looks at specific task details to see if they match what you’ve set.
- Advanced Compare: Compares two things using special codes or patterns. It’s like asking if a word starts with or contains certain letters.
- Affected Services: Jira checks if the issue is related to specific services you’ve chosen.
- Form Exists: Simply, is there a form attached to the task?
- If/Else Block: Like a flowchart. If one thing is true, Jira does this; if not, it does that.
- Issue Attachments: Jira scans comments or descriptions to see if there are files attached.
- JQL: Jira uses its special query language to find tasks that fit a specific formula or criteria.
- Related Issues: Checks if the main task has other tasks linked to it.
- User: Jira checks if a specific user is involved or if they belong to a group.
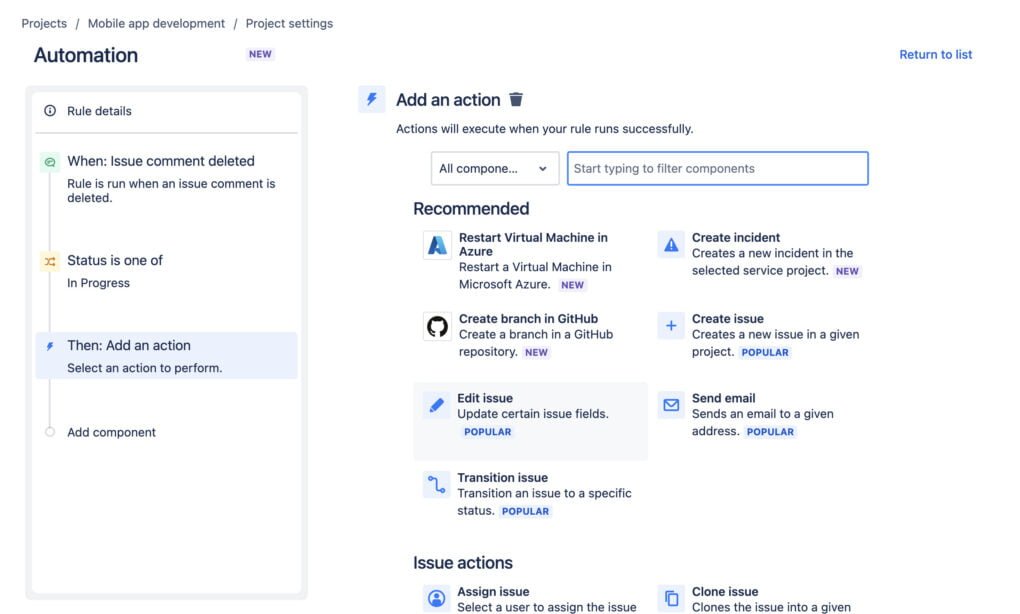
Actions:
What Jira does in response, such as sending an alert.
- Assign Issue: Jira can hand a task to someone.
- Attach & Copy Forms: Add forms to a task or copy them over.
- Clone Issue: Makes a twin of the task.
- Comment & Manage Comments: Chat on a task, edit what’s said, or remove some chats.
- Sprint Actions: Start, end, or create new phases of a project.
- Sub-task Creation: Break a task into smaller bits.
- Use Smart Values: Store special values to use later.
- Edit & Manage Tasks: Update task details, links between tasks, or even delete tasks.
- Link Issues: Connect one task to another.
- Log Work & Search Tasks: Note down time spent or find tasks using Jira’s search.
- Watchers: Add or remove those keeping an eye on a task.
- Transition & Email: Move a task along or email details.
- Chat Integrations: Send alerts on Teams, Slack, or via Twilio.
- Web Requests: Jira can ‘talk’ to other websites.
- Refresh Data: Get the newest details again.
Branching
Jira tasks often don’t stand alone. They may have sub-tasks, be part of bigger tasks, or be linked to other tasks. Branching lets one rule affect many related tasks.
With branching, a single automation rule can reach out and take actions on multiple related issues. For example, if a main task is done, branching can automatically check (or change) the status of its sub-tasks.
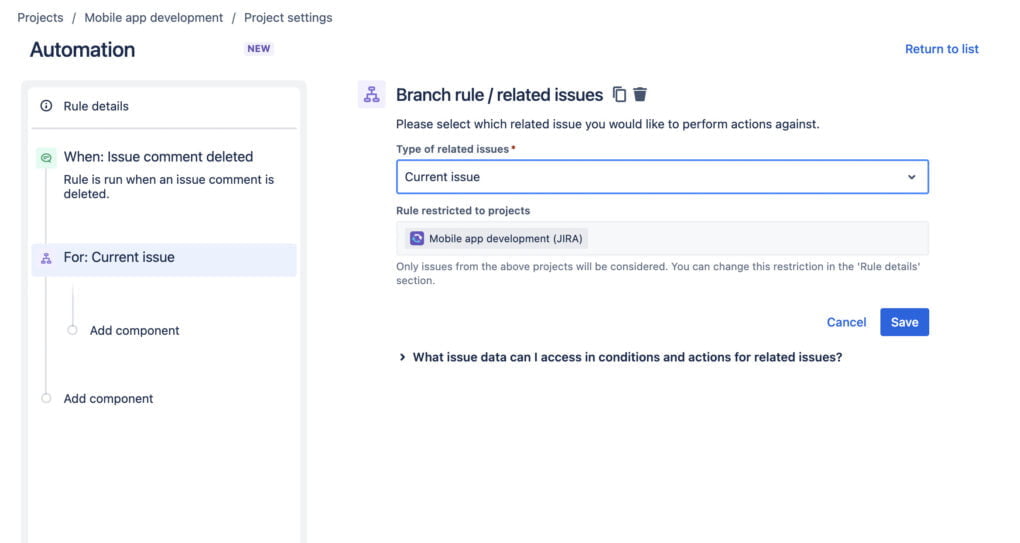
Learn more about Branching here with Atlassian Document
Rule Status
It’s like a traffic light for your Jira automation rules. It tells you if a rule is running, stopped, or somewhere in between.
- ENABLED: Your rule is active and doing its job.
- DISABLED: Your rule is currently on a break and won’t run.
- DRAFT: You’ve made changes to the rule, but they’re not live yet.
Keeping an eye on rule status ensures your automation work as expected. If something seems off, checking the rule status is a good first step.
Smart Values
They’re dynamic bits of data that Jira can plug into your rules. Think of them as placeholders that Jira fills in with real-time info.
Examples:
- {{issue.summary}}: Jira will replace this with the title of the task.
- {{now.plusDays(5)}}: Here, Jira calculates a date 5 days from now.
They add flexibility. Instead of hard-coding data into a rule, smart values let the rule adapt to each task’s unique info.
Insert them in comments, emails, or even in field updates. For instance, you can set an automatic comment like “Thanks for submitting {{issue.summary}}. We’ll review it soon!”
Jira offers a range of smart values. Some are simple, while others, like date calculations, take a bit more understanding. But once you get the hang of it, they’re a game-changer!
Learn more about smart value here
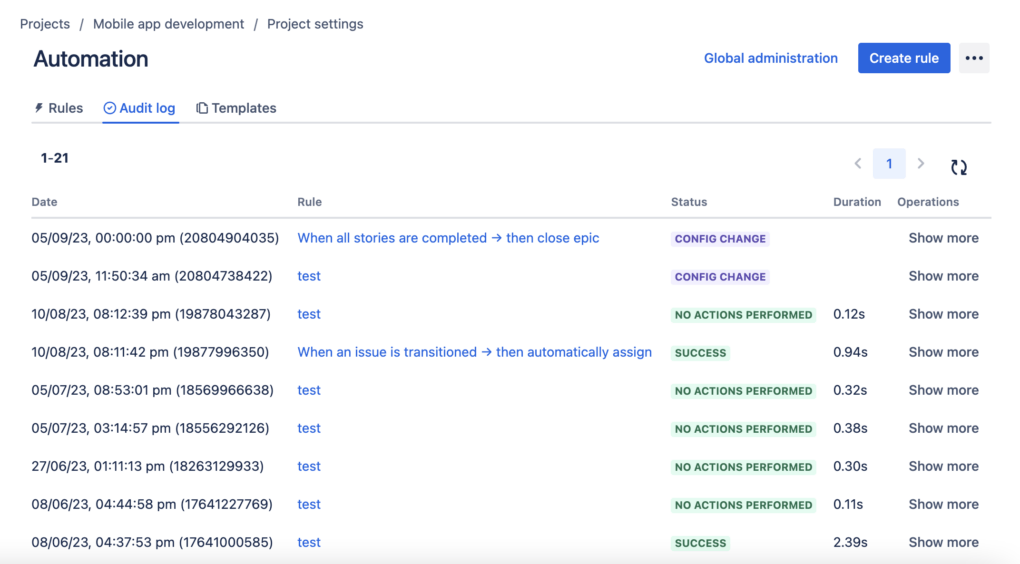
Audit Log
It’s like the memory bank for your Jira rules. It remembers when a rule was set into motion, how it concluded, and the actions it undertook.
Levels of Viewing:
- Individual Rule: See the life story of a single rule – when it activated, its actions, and the outcomes.
- Project-wide: Get an overview of all the rules in action within a particular project.
- Global Scope: Step back and view the big picture – an audit trail of all rules across Jira.
In a nutshell, Jira’s Audit Log is like a detective’s notebook, detailing every twist and turn your rules take.
Detailed information on Jira’s Key Components with Atlassian document
How to Build New Automation Rules in Jira
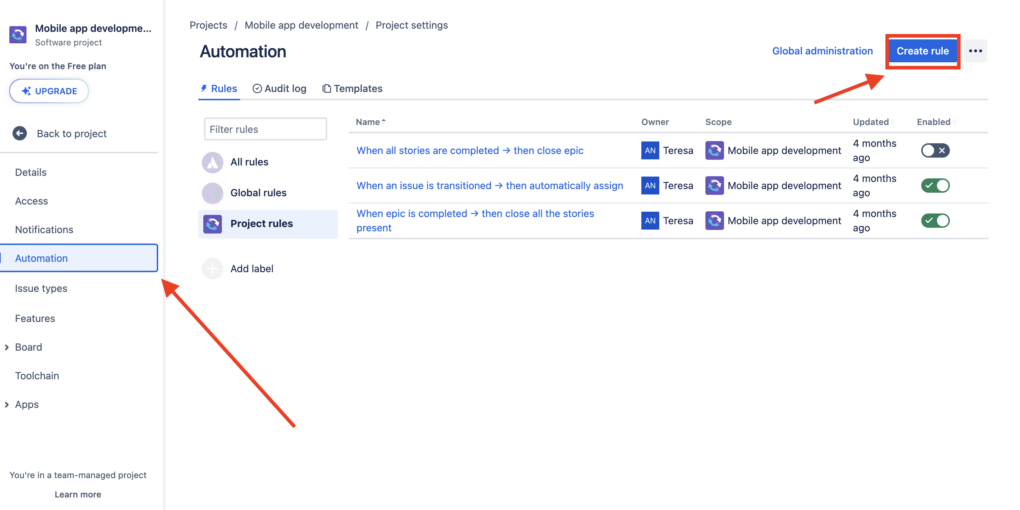
1. Access Automation:
- If you’re a Jira admin or a project admin, navigate to your project.
- Click on ‘Project settings’ (usually found on the bottom left).
- From there, select ‘Automation’.
2. Begin Rule Creation:
- Click the ‘Create rule’ button.
- This takes you to the rule builder interface, where the magic happens.
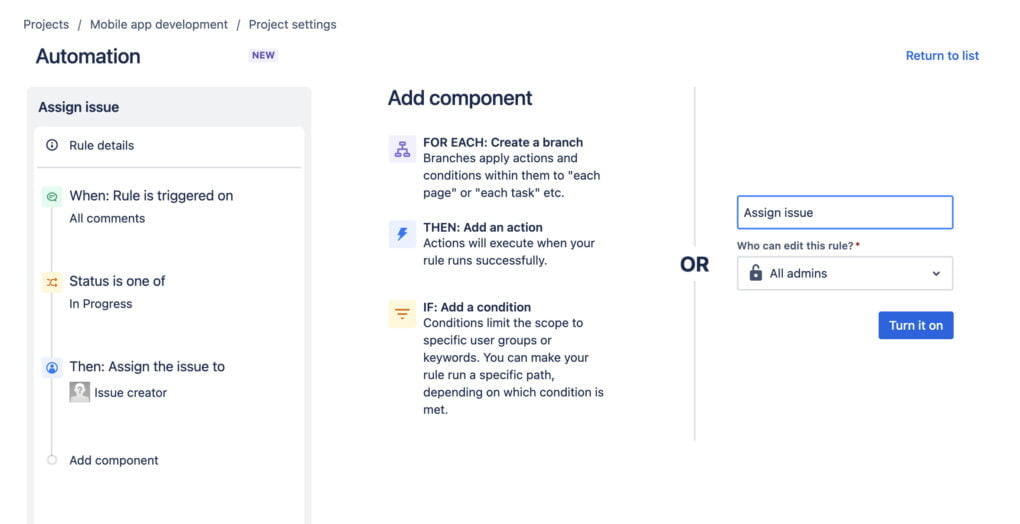
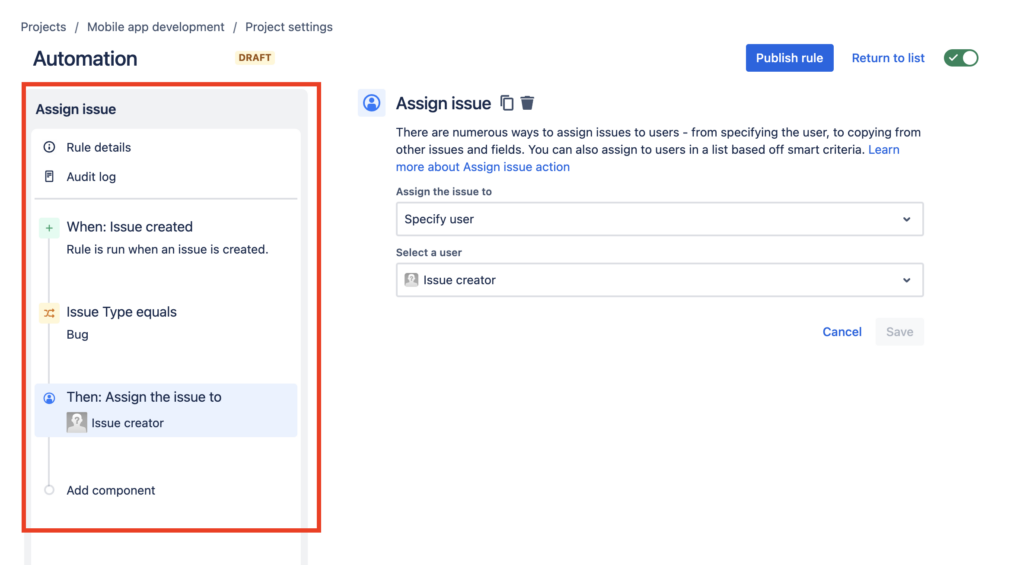
3. Select a Trigger:
- This is the event that initiates your rule. Examples include “Issue Created”, “Comment Added”, or “Status Changed”.
- Click on ‘Add trigger’ and choose the one that suits your need.
4. Set Conditions (Optional but recommended):
- After your trigger, you might want to add conditions. This refines when your rule will run.
- For instance, you might only want to act on ‘High Priority’ issues or only issues in a specific Epic.
- Click ‘Add condition’ and configure as needed.
5. Choose the Action:
- This is what happens when the trigger (and any conditions) are met. Actions can be things like “Send an Email”, “Transition Issue”, or “Assign Issue”.
- Click on ‘Add action’ and select your desired outcome.
6. Branching (Advanced, optional):
- If you want your rule to operate on linked issues, sub-tasks, or other related issues, you can add ‘Branch rules’. This allows your main rule to branch out and perform actions on these other issues.
7. Name and Save:
- Give your rule a clear name so you (or others) can easily identify its purpose later on.
- Once satisfied with the setup, click ‘Turn it on’.
8. Test your Rule:
Before fully relying on it, test the rule to ensure it works as expected. This can be done by manually triggering the rule or observing its behavior over time.
Top 5 Automation Rules Every Jira User Should Know
Auto-Assign Based on Issue Type or Component:
- Trigger: Issue Created
- Condition: Issue type is “Bug” or Component is “UI”
- Action: Assign to a specific user or a user group, like the QA team or UI team.
- Why It’s Useful: This rule ensures that tasks are instantly assigned to the right team or individual without manual intervention, speeding up the response time.
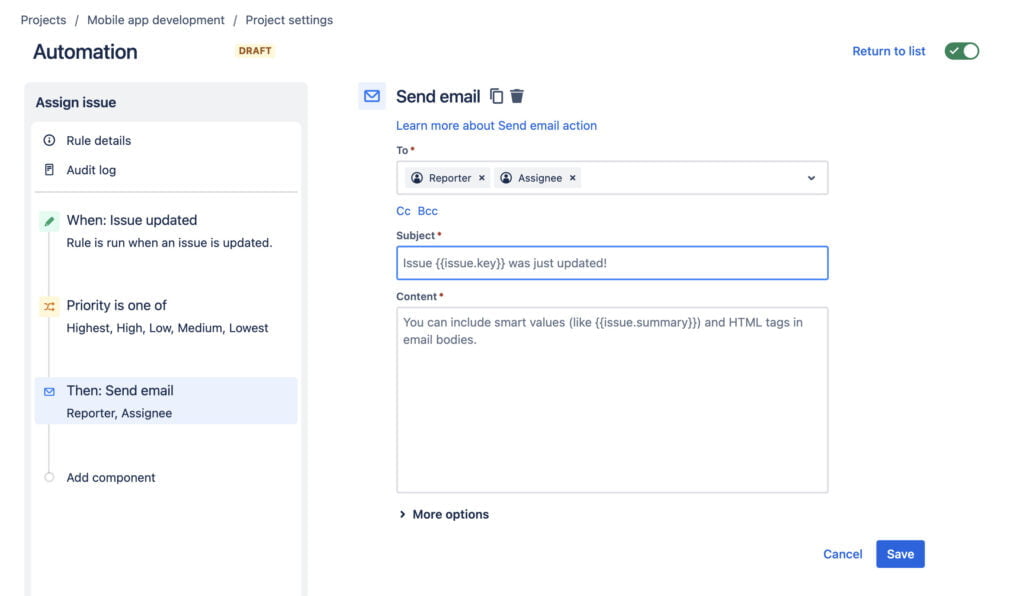
Notify Stakeholders on Priority Changes:
- Trigger: Issue Updated
- Condition: Priority field has changed
- Action: Send an email notification to the issue reporter, assignee, and specific stakeholders.
- Why It’s Useful: Immediate notification ensures that everyone is aligned on priority shifts and can adjust their efforts accordingly.
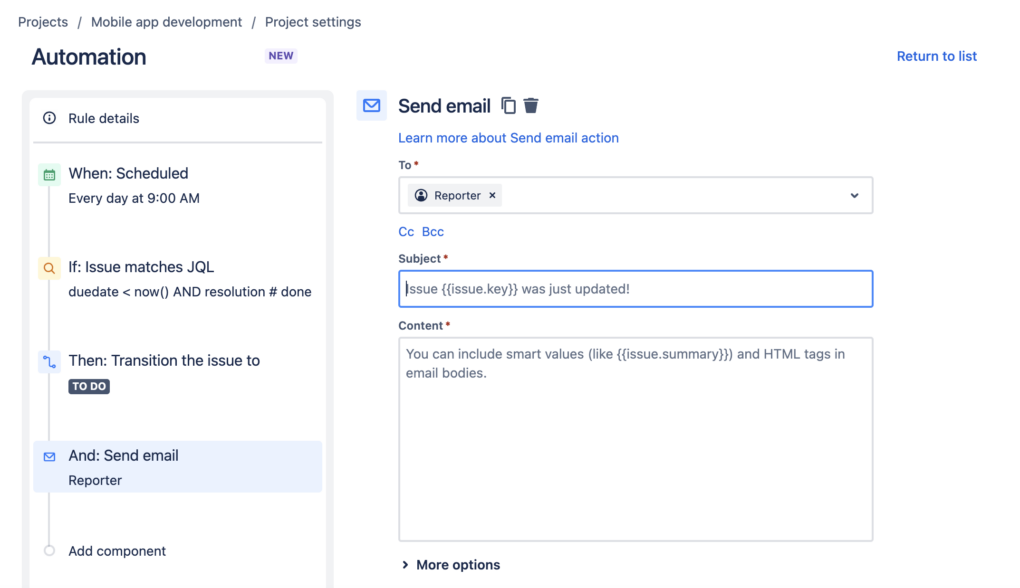
Automatic Escalation for Overdue Issues:
- Trigger: Scheduled (e.g., check every day at 9 AM)
- Condition: Due date is past and issue status is not “Done”
- Action: Transition issue to an “Escalated” status and notify the project manager.
- Why It’s Useful: Helps in proactively addressing delays and ensures that overdue tasks don’t go unnoticed.
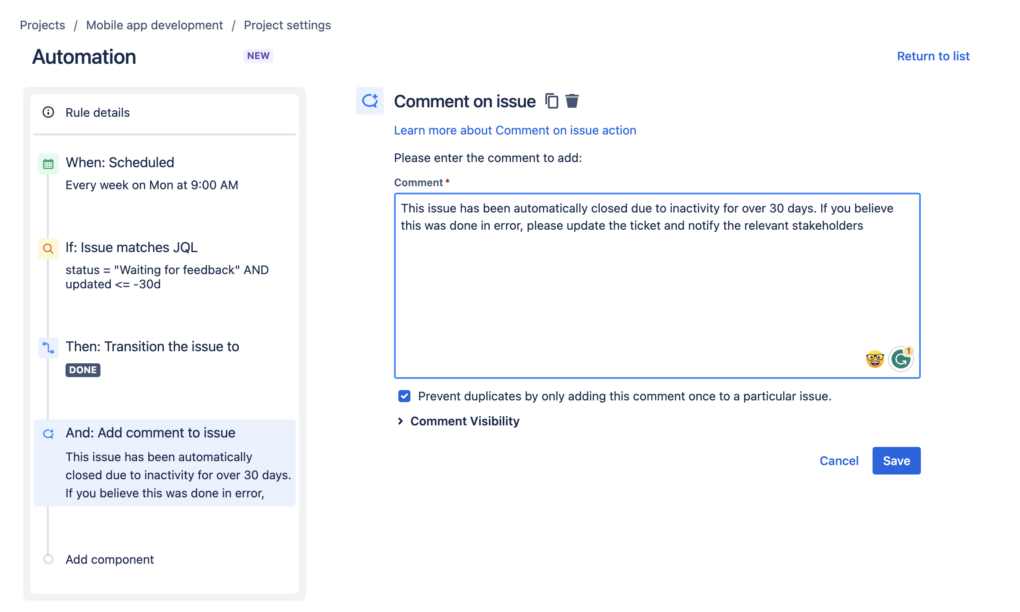
Close Dormant or Stale Issues:
- Trigger: Scheduled (e.g., check every week)
- Condition: Last comment or update was more than 30 days ago, and issue status is “Waiting for feedback” or similar.
- Action: Transition issue to “Closed” or “Archived” or “Done: and add a comment noting the automatic closure due to inactivity.
- Why It’s Useful: Keeps the backlog clean and focuses the team’s attention on active and relevant tasks.
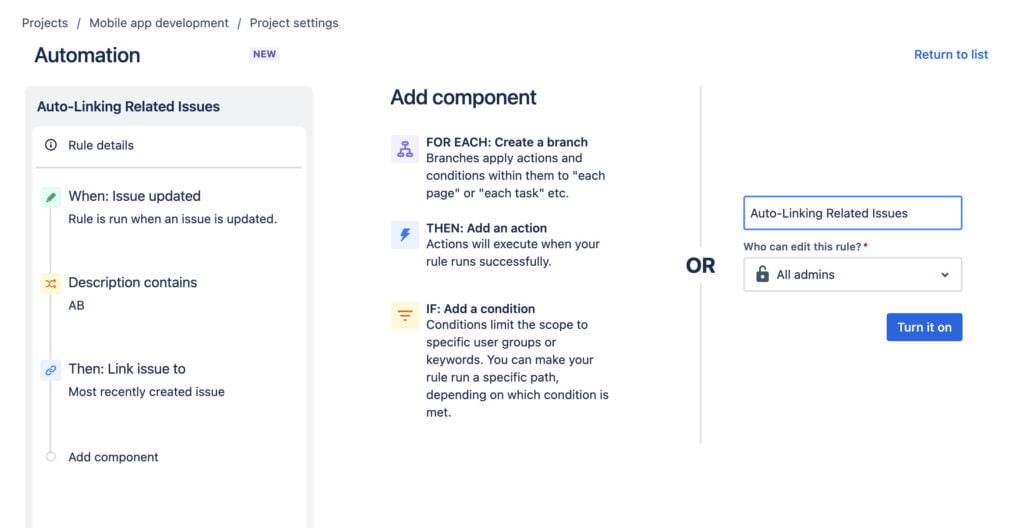
Auto-Linking Related Issues:
- Trigger: Issue Created or Updated
- Condition: Issue summary or description contains a specific keyword or phrase, or mentions another issue key.
- Action: Link the issue to another relevant issue.
- Why It’s Useful: Maintains context and relationship between tasks, making it easier for teams to understand dependencies and related work.
Best Practices for Jira Automation
Jira Automation can greatly enhance the efficiency and consistency of your workflows. To make the most of it, consider the following best practices:
Start Simple:
Especially if you’re new to automation, begin with simpler rules to understand the ropes. For instance, try automating repetitive tasks like assigning certain issue types to a specific team.
Thoroughly Test New Rules:
Before applying a rule project-wide or globally, test it on a few issues to ensure it works as intended. This avoids unintended consequences or disruptions.
Document Your Rules:
For complex rules or when you have multiple rules in place, documentation can help your team understand the logic and purpose behind each rule. Consider adding comments or descriptions to each rule in Jira.
Prioritize Transparency:
Ensure that any automated actions, especially those affecting issue statuses or assignees, are accompanied by automated comments. This keeps everyone informed about what has happened and why.
Use Labels and Components Effectively:
Automation can be refined by using Jira’s built-in fields like labels and components. For example, auto-assign issues based on components.
Prioritise Your Automation
Atlassian has announced new automation limits that could thwart you. Plan them wisely and use other tools e.g. for scheduling shuffles like Issue Scheduler.
Integrate With IT Asset Management Tools
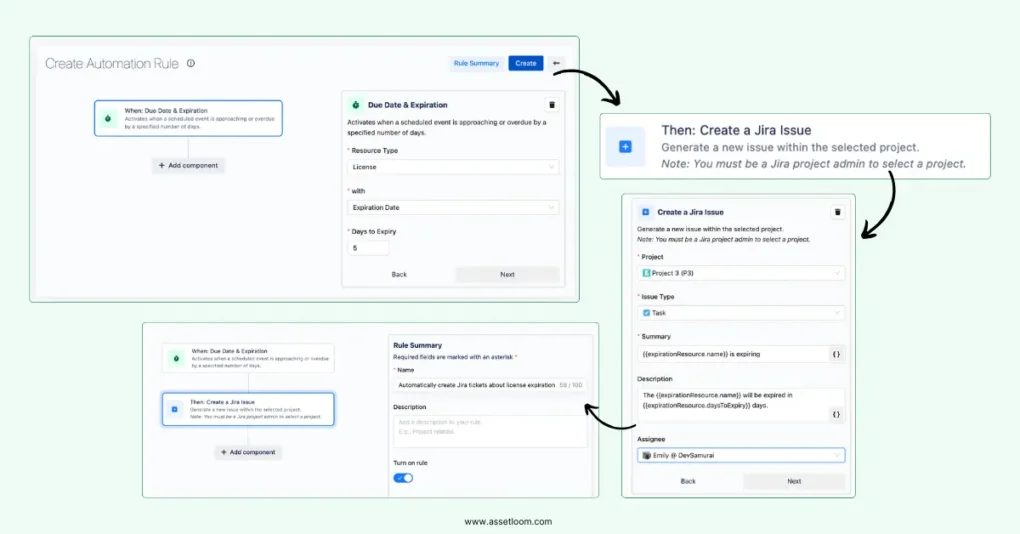
Integrating Jira automation rules with an IT Asset Management tool like AssetLoom can significantly streamline IT operations. For example, by leveraging AssetLoom’s Jira integration, you can create an automation rule that triggers a Jira ticket whenever a software license in AssetLoom approaches its expiration threshold. This proactive approach ensures timely license renewals, preventing disruptions to service and avoiding potential compliance issues. The rule can automatically populate the Jira ticket with relevant information from AssetLoom, such as the software name, license key, expiration date, and assigned user, providing IT teams with the context they need to take immediate action. This integration not only automates a critical task but also improves communication and collaboration between IT asset management and support teams.
Learn more about AssetLoom Integration with Jira Service Management at: Asset Management Integration
Conclusion
Throughout this blog, we’ve taken a deep dive into the essentials of Jira automation, from understanding its fundamental components to the best practices that ensure its optimum use. We’ve learned the significance of triggers, conditions, and actions, explored the top automation rules every Jira user should have in their arsenal, and examined the precautions and considerations to keep in mind.
In wrapping up, remember that the ultimate goal of Jira automation isn’t just about speeding up processes. It’s about enhancing collaboration, reducing errors, and ensuring that your team can consistently deliver quality work. Whether you’re just starting out with Jira or are looking to refine your existing setup, we hope this guide has given you valuable insights and actionable takeaways. Dive in, experiment, and here’s to smarter, more efficient workflows!