Remember when we chatted about the differences between Team-Managed and Company-Managed Projects in Jira in our earlier blog post? You can catch up right here if you haven’t read it yet. But today, we’re going to delve even deeper. We’ll focus on a special feature that both these project types have in common – custom fields. Think of them as your secret weapons for effective project management. So, are you ready to explore? Let’s dive right in!
Understanding Custom Fields in Jira
Jira is all about helping you manage your projects, and a big part of that is how it organizes information. In Jira, application issues are made up of fields. You can pick and choose which fields appear when you’re creating, editing, or transitioning issues.
About custom fields in Jira, these are the special ones you can create for teams working on issues within any of your Jira projects. Think of them as your team’s personalized sticky notes, with information specific to your team’s needs.
Here’s why they’re cool: they’re entirely customizable. You decide what information goes into these fields. It could be the due date, a priority level, or a drop-down menu indicating the project phase. The power is in your hands.
The advantage? Custom fields make categorizing, filtering, and managing your issues a breeze. They also provide a more detailed overview of each issue, so your team can hit the ground running with all the necessary information.
So, if you’re looking for more control and flexibility in your project management, look no further. Custom fields in Jira are your best friends.
Custom Fields in Team-Managed Projects
First things first, you need to be an administrator role for your project to be able to do this
Let’s talk about adding custom fields in Team-Managed Projects
Here’s how to do it:
- Go to your project settings.
- Click on ‘Issue Types’.
- Select the issue type you want to customize, and click on ‘Fields’.
- Click ‘Add a field’ and create a new custom field.
- Save changes and boom! You’ve got a new custom field ready for use.
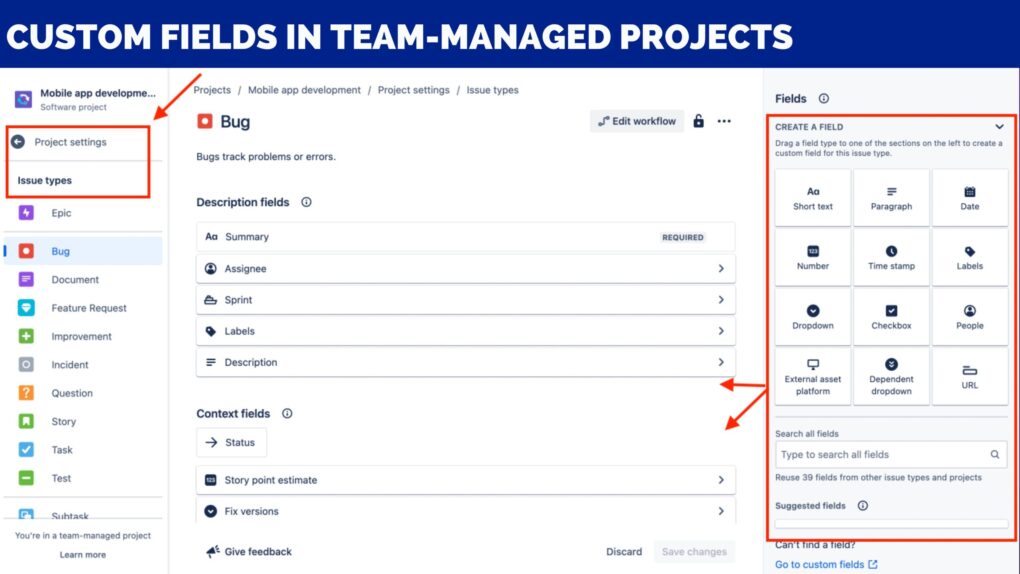
You can learn more detail here: Customize an issue’s fields in team-managed projects
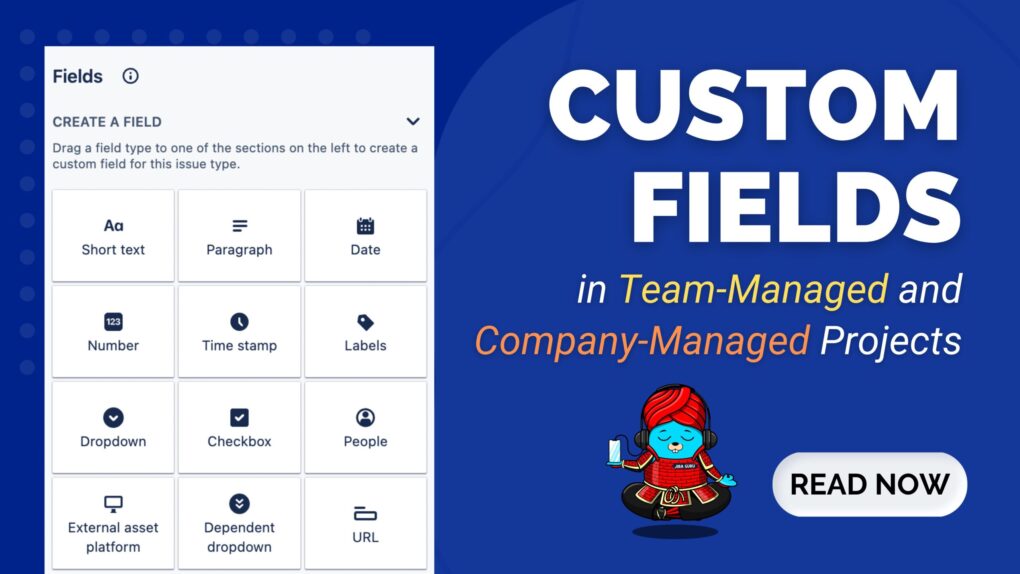
You’ve got lots of choices when it comes to the types of custom fields you can add in Team-Managed Projects:
- Checkbox fields: for simple yes or no decisions or selecting from multiple options.
- Date fields: to keep track of deadlines.
- Dependent dropdown fields: where one choice depends on another.
- Dropdown fields: to choose from multiple options.
- Labels fields: great for categorizing your tasks.
- Number fields: for when the info you need is a number.
- Paragraph fields: for longer bits of information.
- People fields: to know who’s working on what.
- Short text fields: for short, sweet, and to the point info.
- Time stamp fields: to know exactly when something happened.
- Time tracking field: to keep an eye on how much time you’re spending on tasks.
Custom Fields in Company-Managed Projects
Alright, it’s time to turn our focus to Company-Managed Projects. Creating custom fields in this type of project is a bit more detailed than Team-Managed Projects, but don’t worry, we’ve got your back! Let’s break it down.
How to Create a Custom Field
- Click on the ‘setting’ icon and select ‘Issues’.
- Under the ‘FIELDS’ section, select ‘Custom fields’.
- Now, click ‘Create custom field’. Make sure to click ‘All’ to see all the available field options.
- Choose the type of field you want to create and click ‘Next’. We’ll provide a list of available custom field types shortly.
- Now, it’s time to add details for your field. The name you choose will be used as the title of your custom field. If you add a description, it’ll show up beneath the field when you’re creating and editing issues.
- Once you’ve entered all the field details, click ‘Create’.

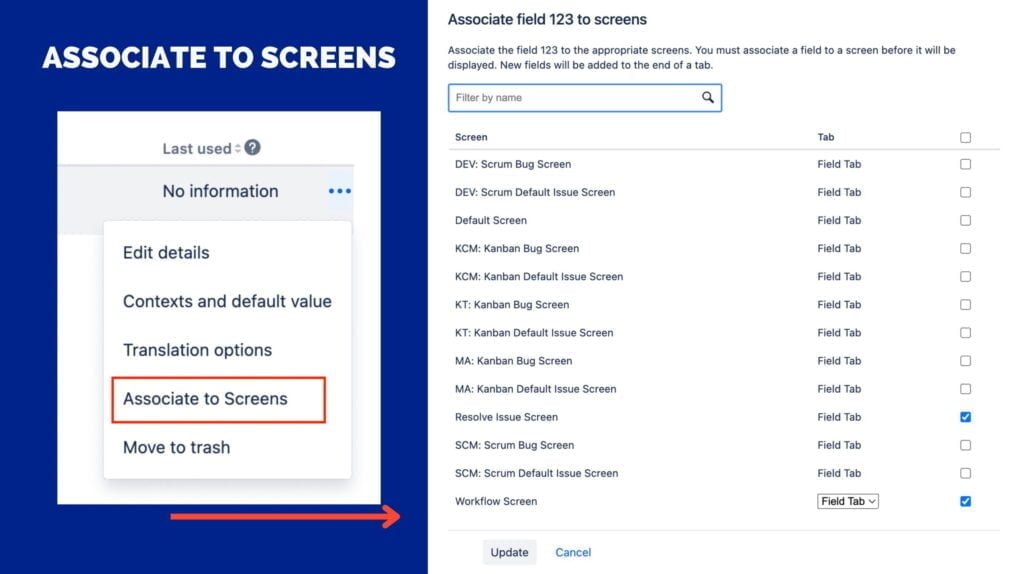
But you’re not done yet! After creating your custom field, you need to associate it with one or more screens
7. Find your custom field and click on the ‘…’ icon, then select ‘Associate to Screens’. You can also click on the field’s contexts link and then click ‘Screens > Associate this field to screens’.
Now that you’ve got the hang of creating and associating custom fields, let’s talk about what types of custom fields you can create. There are a lot of options, so get ready!
- Checkboxes: This field type allows you to select one or more options from a list.
- Date Picker: As the name suggests, this field type enables you to pick a date from a calendar pop-up.
- Date Time Picker: Similar to the date picker, but this one lets you choose a specific time along with the date.
- Labels: This field type helps to categorize issues using keywords. It’s a free text field, and the labels you enter can be used as search criteria.
- Number Field: Use this field when you need to capture numeric information.
- Radio Buttons: Unlike checkboxes, radio buttons allow you to choose only one option from a list.
- Select List (cascading): This field type gives you a two-tiered single selection. The options in the second list are dependent on what you select in the first list.
- Select List (multiple choices): With this, you can select more than one option from a list.
- Select List (single choice): As the name implies, this field allows you to select a single option from a list.
- Paragraph (supports rich text): This field type is used for entering longer blocks of text. It supports rich text formatting.
- Short Text (plain text only): This is a single-line text field that’s used for short pieces of information. Unlike the paragraph field, it only supports plain text.
- URL Field: This field type is used for entering web addresses. It formats the text as a hyperlink for easy access.
- User Picker (single user): This field type lets you select a user from a dropdown list. This is particularly handy when you want to assign tasks or need to specify who’s responsible for something.
Advanced Custom Field Types:
- Assets: Link assets to an issue
- Date of first response: The date of the first comment on an issue by anyone other than the reporter
- Days since last comment: Date/time since last comment (restricted comments are considered on a per-user basis). This field is not searchable or sortable.
- Domain of assignee/reporter: The domain name of the assignee or reporter
- Global rank: Global rank field for Jira Software use only
- Group picker (multiple groups/single group): Choose a user group using a popup picker window
- Last commented by a User Flag: Displays true if the last commenter is not a Jira developer.
- Last public comment date: Date/time of the last public comment (restricted comments are ignored). This field is searchable and sortable.
- Message Custom Field (for edit/view): A custom field whose default value will be displayed as HTML or as rendered wiki markup in OnDemand on the ‘Edit’/’View’ screen.
- Number of attachments/comments: A custom field that stores the number of attachments/comments for an issue.
- Participants of an issue: Displays reporter, current assignee, and all commenters of the issue
- Project picker (single project): Choose from projects that the user can view in the system.
- Team: Associate issues to a specific team.
- Text field (read only): A read-only text label. Only possible to create values programmatically. Maximum of 255 characters.
- Time in status: Store statistics about the amount of time/times an issue has spent/been in its statuses.
- User Picker (multiple users): Choose multiple users from the user base via a popup picker window.
- User Property Field (<255 characters): Choose multiple users from the user base via a popup picker window.
- Name of last updater or commenter: Display the name of the last updater or commenter depending on which happened most recently.
- Version Picker (multiple versions/single version): Choose from available versions in the project.
Configure a custom field – Atlassian Document
Tips for creating custom fields
Creating custom fields in Jira can greatly enhance your project management, but it’s crucial to use this feature effectively. Here are the top 5 tips you should keep in mind:
- Define the Purpose: Ensure that every custom field you create has a clear, well-defined purpose. The field should serve a specific need in your project management. Avoid creating fields that overlap in function.
- Keep it Simple and Clear: The name and purpose of the custom field should be easy to understand. Avoid complex terms or jargon. The simpler and clearer the field, the higher the chances of it being used correctly by the team.
- Reuse Before Creating New: Before creating a new field, check if there’s an existing one that could serve the same purpose. Too many custom fields can lead to confusion and inefficiency.
- Choose the Right Field Type: Select the field type that best suits the kind of data you want to capture. Each field type serves a different purpose and choosing the right one will enhance usability.
- Regular Maintenance and Review: Regularly audit your custom fields. If a field is no longer relevant or used, consider removing it. This will help you keep your workspace clean, organized, and efficient.
Conclusion
Creating custom fields in Jira, whether for Team-managed or Company-managed projects, provides a powerful tool for tailoring your project management to meet your team’s unique needs. With this functionality, you can capture and track precisely the information that matters most to your project’s success.
Remember, the key to effective use of custom fields lies in clear definition, simplicity, and regular maintenance. It’s crucial to ensure that every field serves a unique purpose, is easy to understand, and remains relevant over time.
By following our tips and guidance, you can leverage custom fields to enhance your Jira projects, making them more organized, efficient, and informative.
About DevSamurai
DevSamurai is a Global IT service company that provides DevOps solutions for Jira, Atlassian and more… using cutting-edge technology to its growing customer base. DevSamurai is customer-centric and helps clients to leverage the power of IT to improve their business. DevSamurai uses cloud computing platforms, DevOps tools, and best practices in global industry standards to guarantee the efficiency of their client’s organization.
If you want even more apps to manage your project, check out these resources: Atlassian Marketplace