Hey there, welcome back to our Jira Guru Series! In this post, we’re tackling something super useful in Jira – the Original Estimate field. If you’ve ever scratched your head wondering how to keep your projects on track time-wise, you’re in the right place.
So, what’s this Original Estimate all about, and how’s it different from other stuff like Remaining Estimate or Time Spent? And, most importantly, how can you use it to make your project run smoother? We’re going to cover all that and more.
What is the Original Estimate in Jira?
Let’s dive into what the Original Estimate in Jira means. It’s your initial prediction of how long a task or project will take. When creating a task in Jira, there’s a field for ‘Original Estimate’ where you enter this time – whether in hours, days, or another unit.
This estimate is crucial for planning. It acts as a benchmark, helping you track progress, manage workloads, and allocate resources. A good Original Estimate is based on understanding the task, available resources, and possibly past data from similar projects.
In essence, the Original Estimate is where you start with time management in any project. It’s expected to evolve as the project progresses, but getting it as accurate as possible initially is key for smooth project execution.
How to Add an Original Estimate Field in Jira?
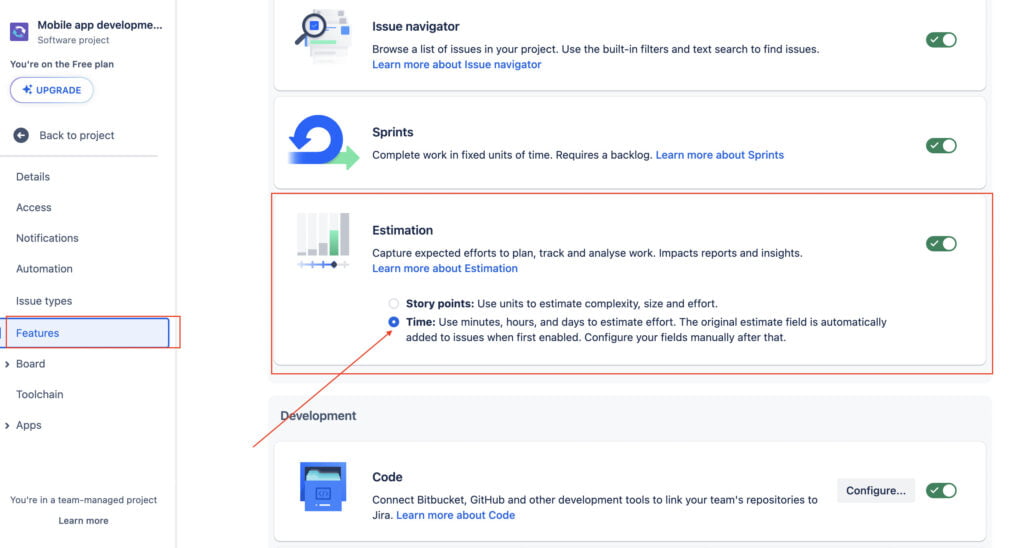
1. Enable estimation For team-managed project
- If you’re not already there, navigate to your team-managed software project.
- Go to Project Settings > Features.
- Enable the Estimation feature.
- Once Estimation is enabled, you can select whether to use Story Points or Time.
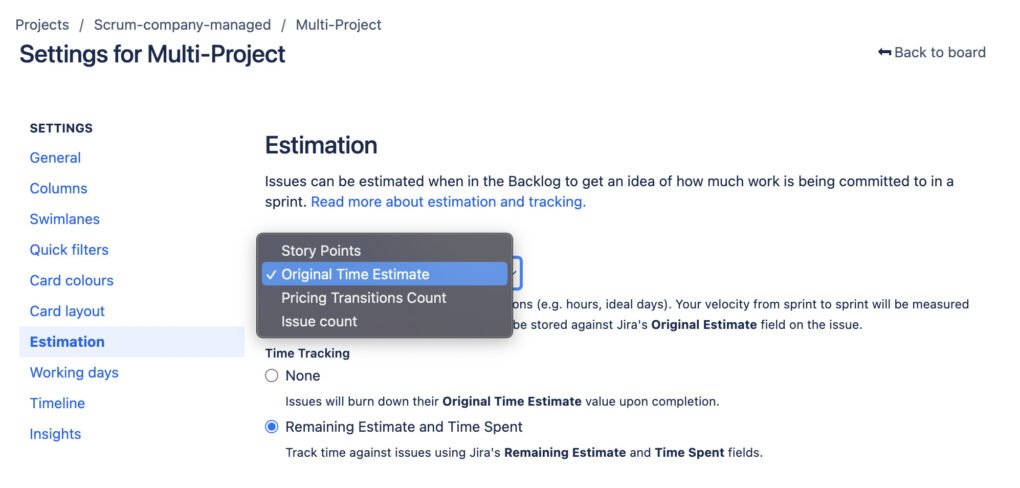
2. Enable estimation for company-managed projects
- From your company-managed board, select more (•••) in the upper right corner of the board > Board settings.
- Select Estimation from the left-side menu.
- Adjust the estimation settings as you desire.
- Use the Estimation Statistic dropdown to change how issues are estimated on your board.
- Use the Time tracking section if you’d like to use a different method to track progress on your board. It’s common for teams to estimate work then track progress using two different methods.
Learn more about Custom fields in Jira
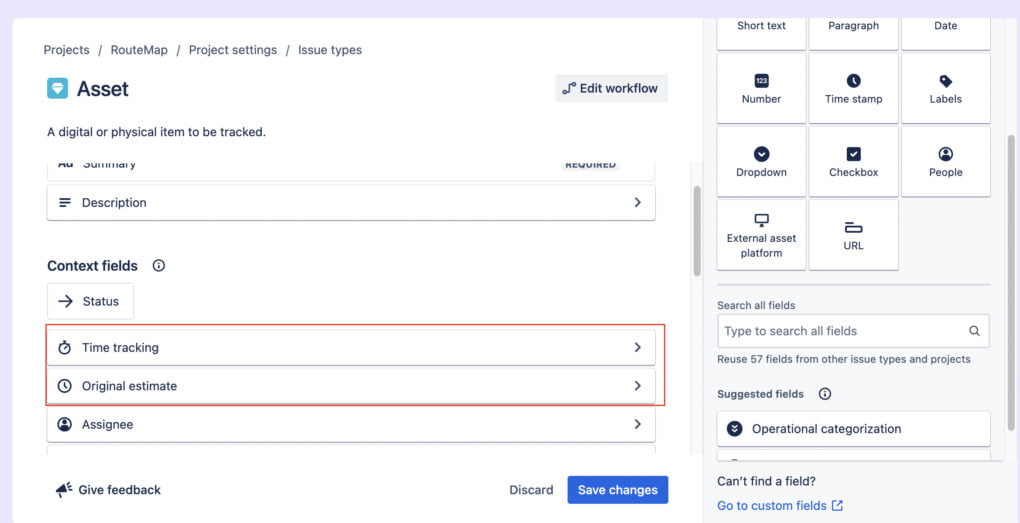
3. Adding the Original Estimate field to your tasks in Jira
- First things first, go to the task or issue where you want to add an estimate.
- Once you’re in the task, look for the ‘Configure’ button on the right bottom corner. This allows you to modify the details of the task.
- Drag and Drop Original estimate field and Time Tracking field (Time tracking field will help you log time and track remaining time)
4. Add an Original Estimate
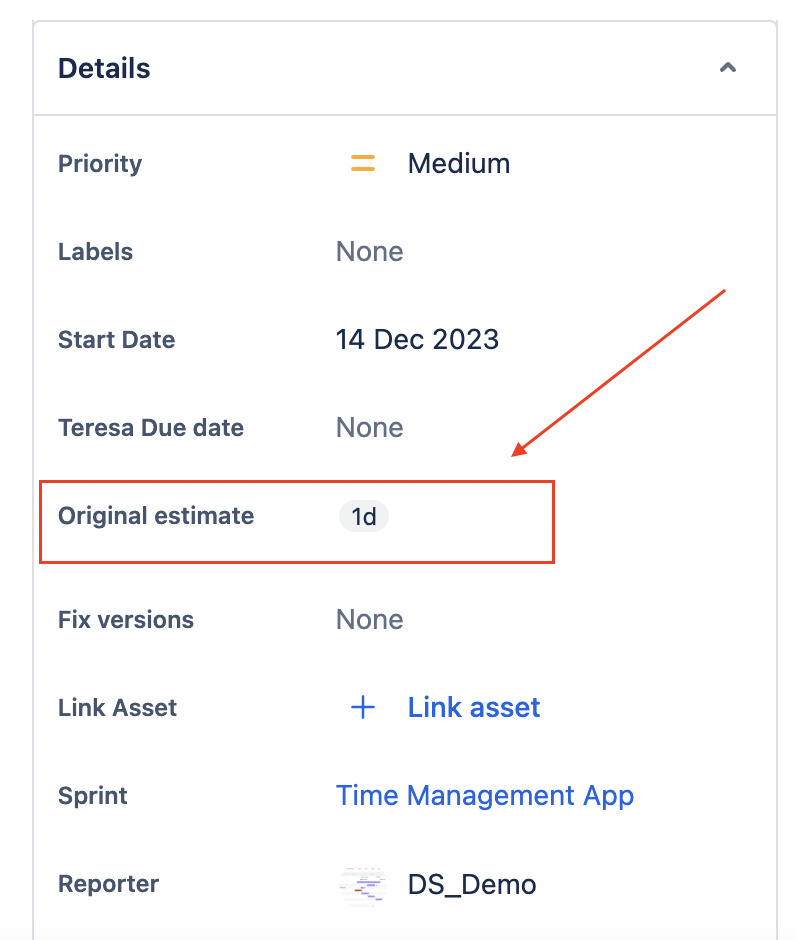
- Click on the Original Estimate field and type in your estimate. Remember, this can be in hours, days, or any time unit that suits your project.
- Once you hit save, your estimate will be recorded and visible to anyone accessing the task.
Also, keep in mind that adding an estimate is more than just filling out a field. It’s about making an informed guess. So, take a moment to consider all relevant factors before jotting down a number.
Original Estimate vs. Remaining Estimate in Jira
In Jira, understanding the difference between ‘Original Estimate‘ and ‘Remaining Estimate‘ is key to managing your project’s timeline effectively. Let’s break down what each term means and how they differ:
1. Original Estimate:
- Definition: This is the initial time you estimate it will take to complete a task or project when you first create it in Jira. It’s your best guess before the work begins.
- Purpose: It serves as a benchmark for planning and tracking. The Original Estimate helps in setting expectations and scheduling the workload at the project’s outset.
- Adjustments: Typically, you set the Original Estimate once and don’t change it. This helps in understanding how accurate your initial predictions were as the project progresses.
2. Remaining Estimate:
- Definition: As the name suggests, this is the estimated amount of time left to complete a task at any given point during its lifecycle. It’s updated as work progresses.
- Purpose: The Remaining Estimate gives a current view of how much work is left. It’s crucial for adjusting plans and expectations as the project unfolds.
- Adjustments: Unlike the Original Estimate, the Remaining Estimate is dynamic. It changes based on the work completed and can be updated regularly by team members.
3. Key Differences:
- Time Perspective: The original Estimate is set at the beginning, while the Remaining Estimate evolves as the project moves forward.
- Adjustment Frequency: The original Estimate is generally static after being set, but the Remaining Estimate is continually updated.
- Project Tracking: While both are important, the Original Estimate is more about initial planning, and the Remaining Estimate is about ongoing project management and adjustments.
- Both estimates play distinct roles: one in planning the road and the other in navigating the journey as you go. Together, they provide a comprehensive view of your project’s time dynamics, helping you keep things on track and adapt as needed.
Story Points vs. Original Estimate in Jira
In Jira, both ‘Story Points’ and ‘Original Estimate‘ are used for planning and tracking, but they serve different purposes and are used in different contexts.
1. Story Points:
- Definition: Story Points represent the relative effort required to complete a task. Instead of focusing on hours or days, they measure the complexity, risk, and effort involved.
- Usage: Commonly used in Agile methodologies like Scrum, Story Points help teams estimate work more abstractly and relatively.
- Benefits: They allow teams to estimate tasks quickly without getting bogged down in hour-by-hour breakdowns. This abstraction can lead to more accurate estimations since it factors in various aspects of the work.
2. Original Estimate:
- Definition: As discussed earlier, the Original Estimate is the predicted time (in hours or days) to complete a task or project.
- Usage: This is more traditional and is used across various project management methodologies, not just Agile.
- Benefits: Original Estimates provide a clear and tangible timeline for tasks, making it easier to align with deadlines and schedule resources.
3. Key Differences:
- Nature of Measurement: Story Points measure complexity and effort in a relative sense, while Original Estimates quantify the time required in absolute terms.
- Methodology Suitability: Story Points are more suited to Agile projects, where flexibility and adaptability are key. Original Estimates are used in a wider range of project types.
- Planning Approach: Story Points facilitate a broader, more holistic approach to planning, whereas Original Estimates require a more detailed and specific time-focused approach.
While both Story Points and Original Estimates are essential tools in Jira for project planning, they cater to different needs and methodologies. Story Points are more about the ‘size’ of the work in terms of complexity, whereas Original Estimates are about the ‘duration‘ it will take to complete the work.
How to View Original Estimate Reports in Jira?
Seeing how your Original Estimates stack up against actual progress is crucial for effective project management in Jira. Jira offers several ways to view this data, allowing teams to monitor and adjust their plans as needed. Here’s how to access and interpret Original Estimate reports:
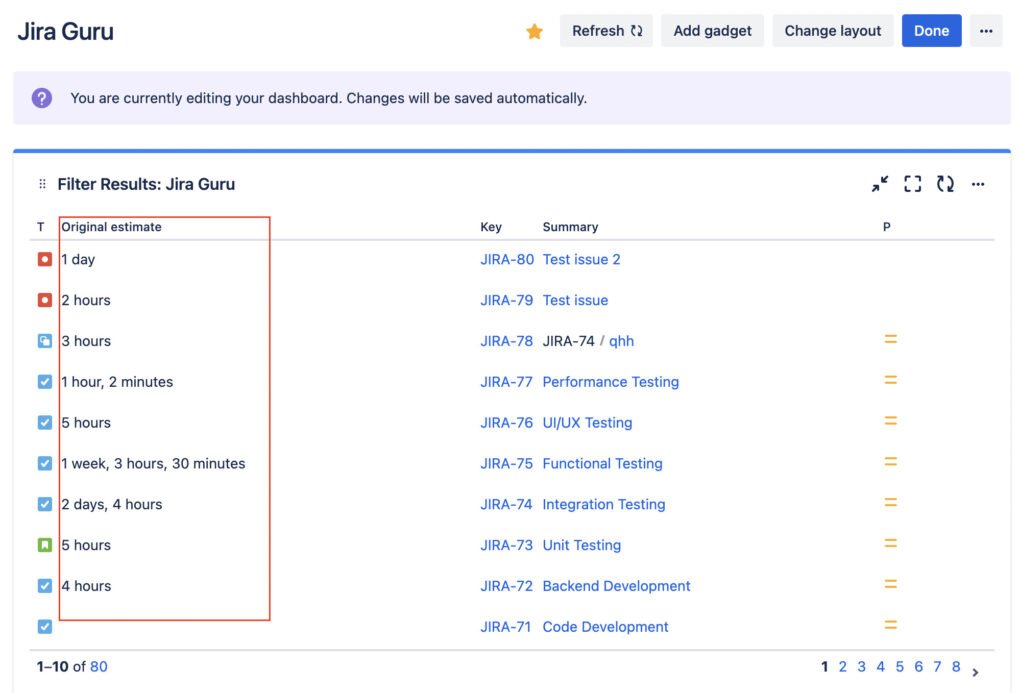
1. Using Jira Dashboards
- Create a new dashboard or use an existing one to track your project’s time estimates.
- Use gadgets like ‘Filter Results’ to display information related to Original Estimates. You can customize these gadgets to show data relevant to your project needs.
- Dashboards provide a visual representation of your data, making it easier to spot trends and patterns in how your team is estimating and spending time on tasks.
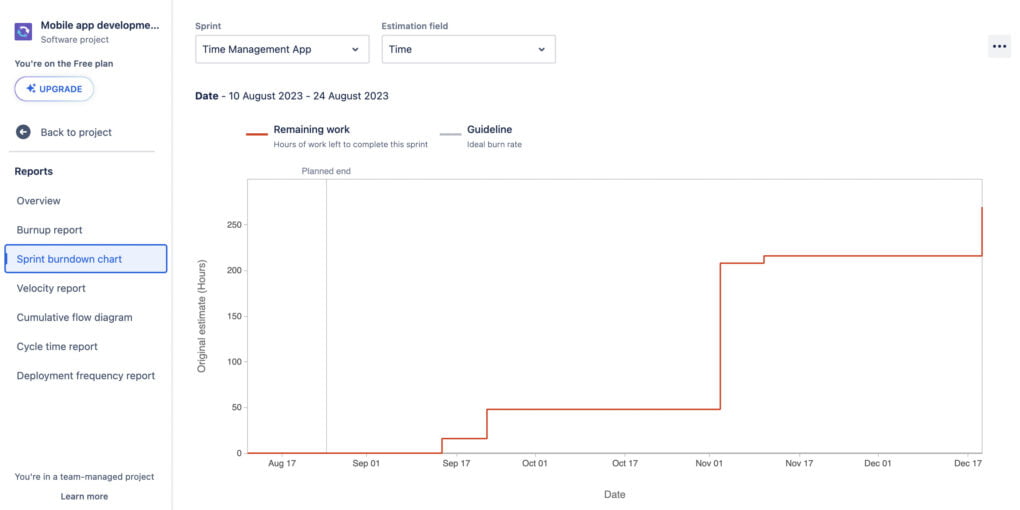
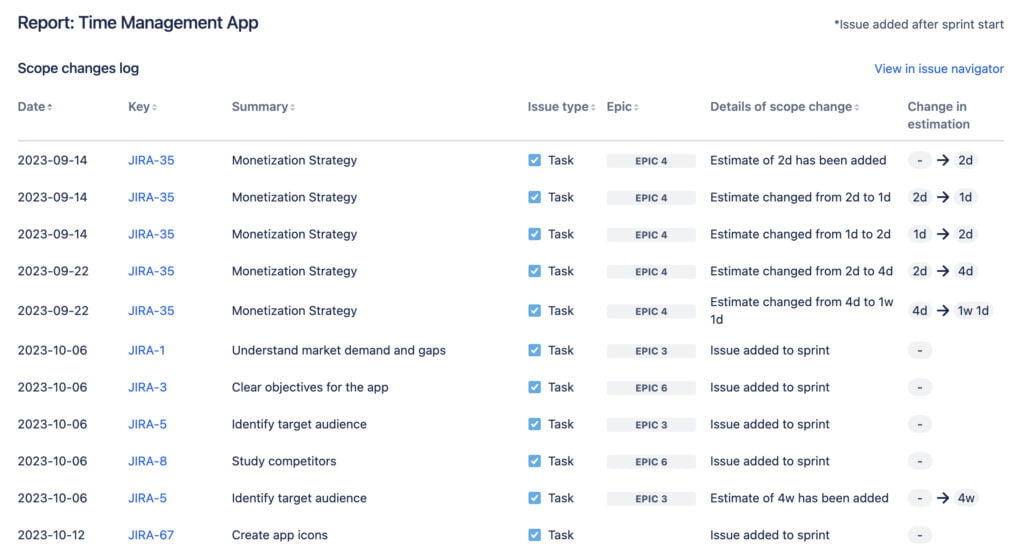
2. Generating Reports
- Jira offers various reports like the ‘Version Report’ and ‘Sprint Report’ that can include time tracking information.
- Go to the ‘Reports’ section in your project, and select the report that suits your needs. Customize it to include Original Estimate data if needed.
- These reports can help you assess the overall progress of your project and understand whether your initial time estimates were realistic.
Tips and Tricks for Enhanced Time Management in Jira
1. Set Realistic Original Estimates
- Before setting an estimate, make sure you fully understand the task’s complexity and requirements.
- Look at similar past tasks to guide your estimates. Learning from history can lead to more accurate predictions.
- Get input from those who will be doing the work. Different perspectives can lead to more realistic estimates.
2. Regularly Review and Update Estimates
- Regularly check the progress against the Original Estimate and adjust the Remaining Estimate as necessary.
- Use discrepancies between estimates and actuals as learning opportunities to refine future estimates.
3. Utilize Jira’s Reporting and Dashboard Features:
- Use dashboards and reports to keep an eye on how actual time spent compares to your estimates.
- Use burn-down charts and other visual tools to quickly assess project progress and time management effectiveness.
4. Integrate Time Management with Other Jira Features:
- If you’re using Scrum, link your time estimates to your sprint planning for better sprint execution.
- Let the time estimates guide you in prioritizing tasks. Tackle high effort or critical tasks early.
5. Leverage Jira Add-ons:
- Explore Time Management Tools: Numerous add-ons in the Atlassian Marketplace can enhance Jira’s time-tracking capabilities.
- Automate Where Possible: Look for add-ons that automate time tracking and reporting for increased efficiency.
Learn about Teamboard ProScheduler and TeamBoard TimePlanner will help you manage original estimates, remaining estimates, time logs and workload effectively in Calendar View.
In wrapping up our guide on Original Estimate in Jira: Tips and Tricks for Better Time Management,’ it’s evident that effectively using Jira’s time tracking features is crucial for project success. The key is not just in setting the Original Estimate, but also in monitoring and adjusting it along with Remaining Estimates and Time Spent as your project progresses.
We hope this piece has armed you with valuable strategies to make the most of Jira’s capabilities. Here’s to managing your time and projects more effectively with Jira!